Arctic Security
The guide
How to set up Arctic Security step by step, what each setting does, which values to choose, and what to do when something goes wrong. Written for version 1.7.
Contents
- Before you start
- Choose a level
- Hide WordPress
- Renamed paths
- Login attempts and lockouts
- CAPTCHA
- Two-factor login
- IP lists
- Passwords
- Users and sessions
- The security check
- Security headers and HTTPS
- Content Security Policy, step by step
- Firewall
- Scan guard
- Files and AI crawlers
- Overview and activity log
- E-mail alerts and the weekly summary
- File check
- Copy settings to another site
- WooCommerce
- Emergency
- Troubleshooting
Step 1
Before you start
Arctic Security changes how your site answers requests, and some settings change addresses. Three things make sure you can always get back in.
Save the recovery URL
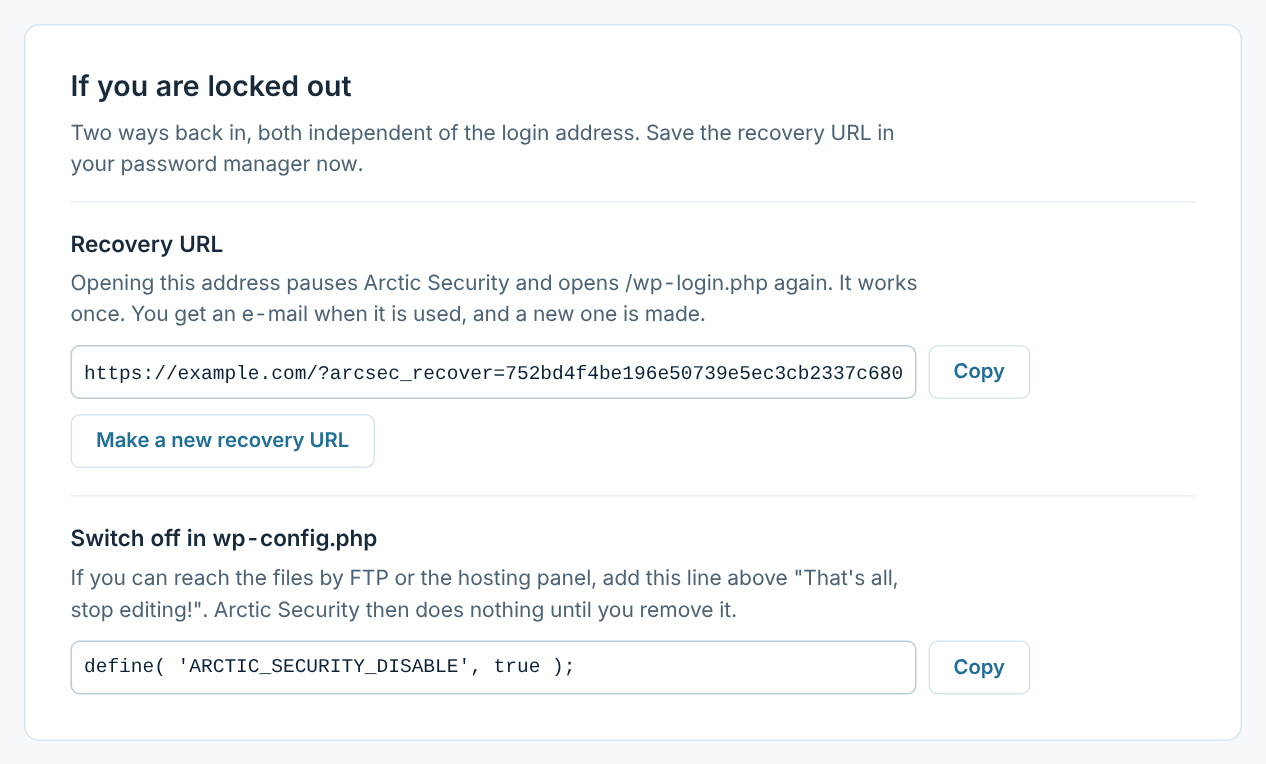
Open Arctic Security → Recovery and copy the recovery URL into your password manager. Opening it pauses all protection at once, opens /wp-login.php again and e-mails the site’s administration address. It works once; a new one is made straight after.
Know the emergency switch
If you cannot reach the recovery URL, add this line to wp-config.php, above “That’s all, stop editing”:
define( 'ARCTIC_SECURITY_DISABLE', true );
The plugin then does nothing at all. Log in at /wp-login.php, fix the setting, and remove the line again.
Keep a copy of .htaccess
On Apache and LiteSpeed the plugin writes its rules to a marked block at the top of .htaccess. Every change is tested at once and taken back if the site answers with a server error, but a copy of the file made before you start never hurts.
Step 2
Choose a level
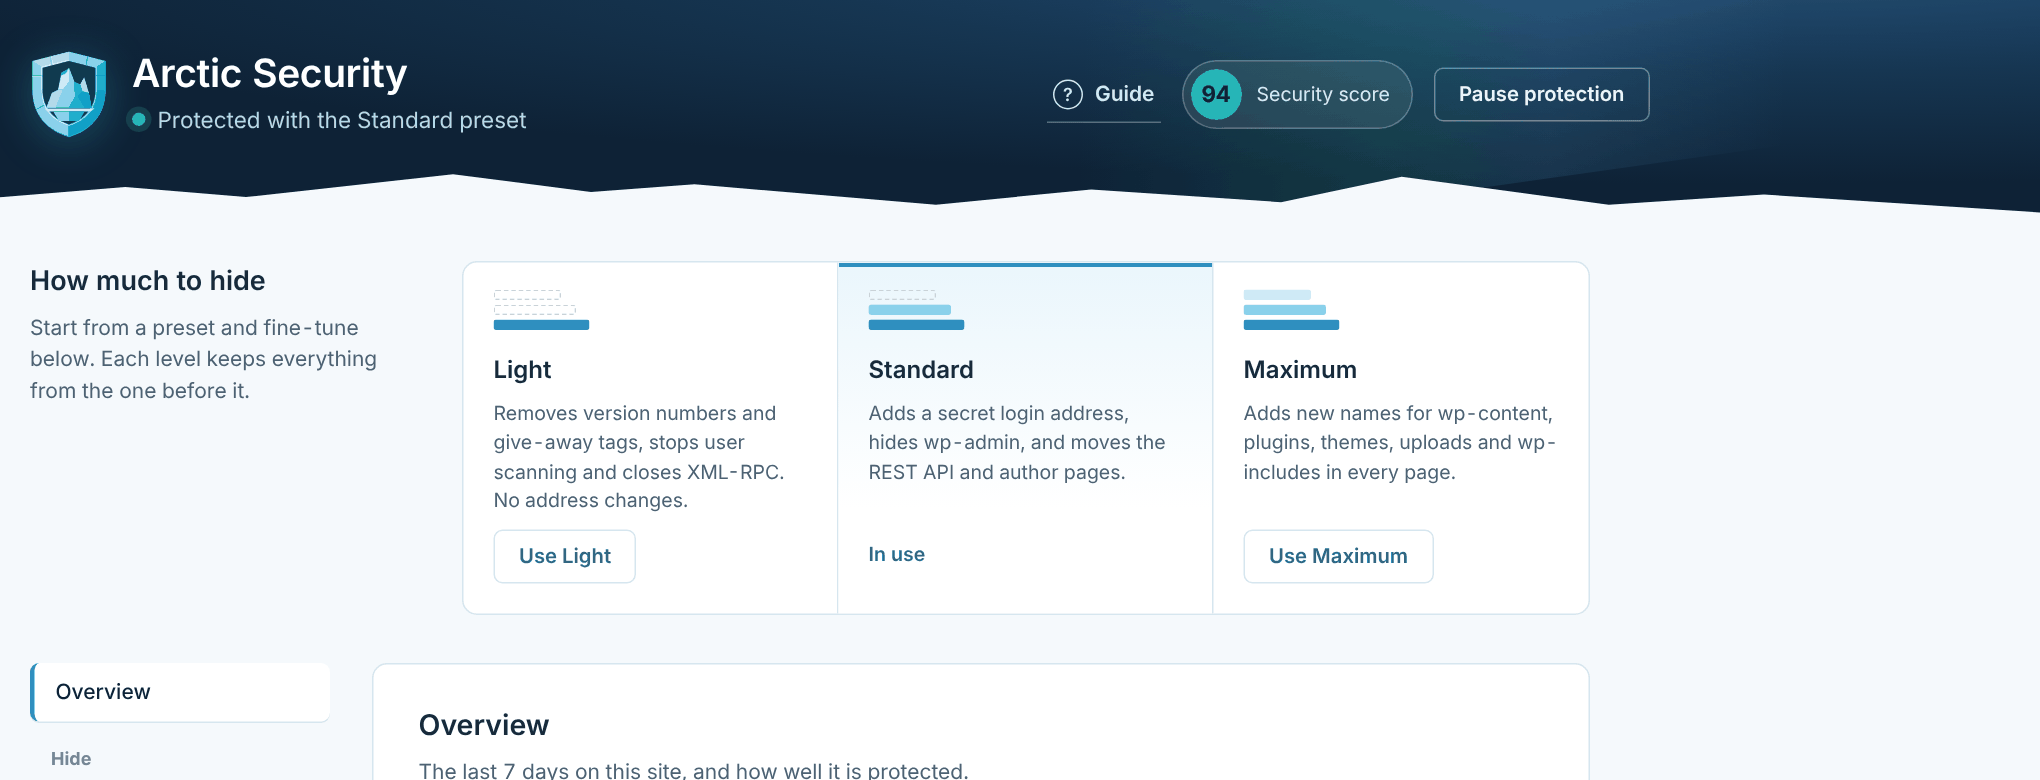
The three presets at the top of the settings page switch groups of settings on in one go. Each level keeps everything from the one before it, and you can fine-tune every setting afterwards.
| Level | What it does | Good for |
|---|---|---|
| Light | Removes version numbers and give-away tags, closes the REST API user list, stops author scanning and switches off XML-RPC. No addresses change. | Every site. This is where the plugin starts. |
| Standard | Adds a secret login address, hides wp-admin from visitors, and moves the REST API and author pages. | Most sites. Bookmark the new login address. |
| Maximum | Adds new names for wp-content, plugins, themes, uploads and wp-includes in every page. | Sites where you control the server and can test properly. |
After choosing a level, open the Security check to see what is left. Login security, headers, the firewall and monitoring are not part of the presets: you switch them on in their own tabs.
Hide
Hide WordPress
Login address
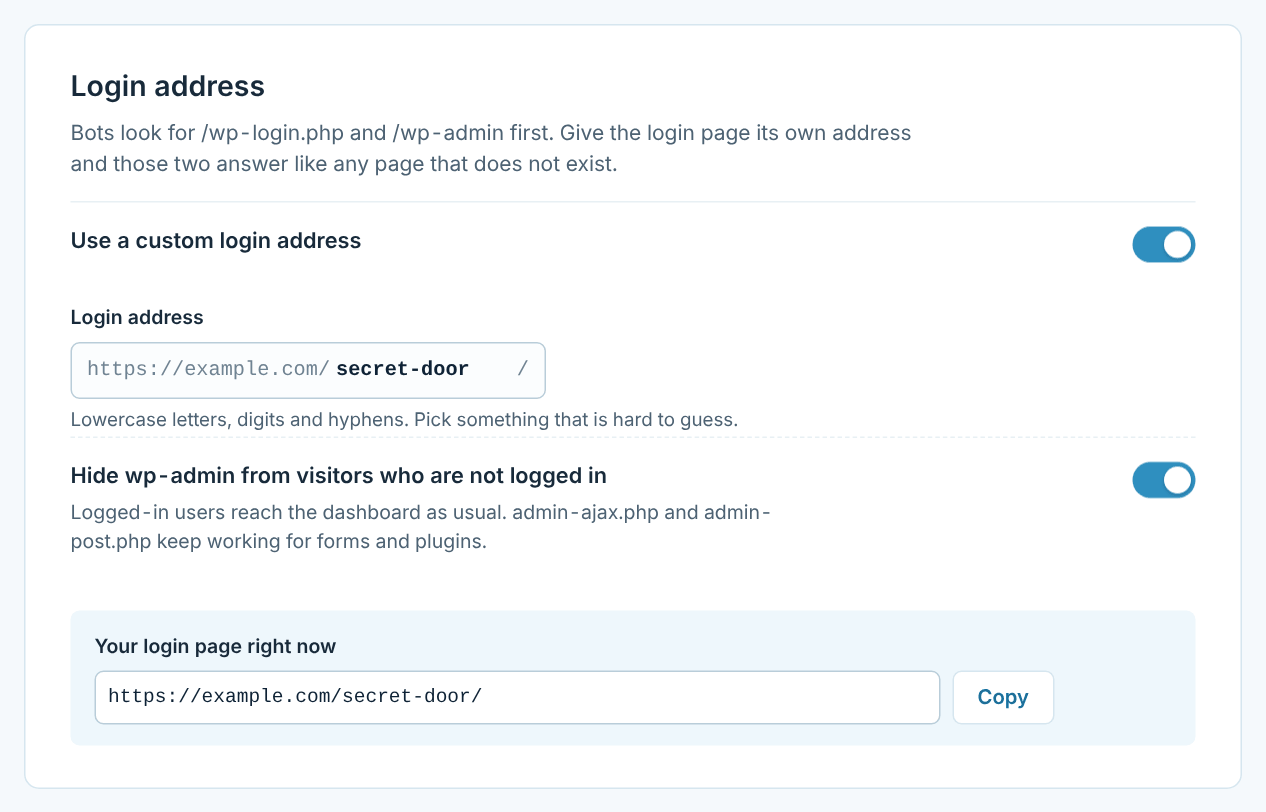
Under Hide → Login you choose your own login address, for example /portal-x7k2/. Use something that is not easy to guess; “login” and “admin” are not allowed. With Hide wp-admin on, visitors who are not logged in get your theme’s normal 404 page at /wp-login.php and /wp-admin, and /login, /admin and /dashboard no longer redirect to the login page.
Page head
Removes the generator tag, version numbers on scripts and styles, RSD and wlwmanifest links, shortlinks, emoji scripts, REST API links, speculative loading rules and HTML comments. None of it changes how the site looks.
API and users
Moves the REST API from /wp-json/ to an address you choose, removes the user list at /wp/v2/users for visitors, stops ?author=1 scans (and can give author pages their own address), and switches off XML-RPC. Leave XML-RPC on only if an app such as the old WordPress mobile app or Jetpack needs it.
Hide
Renamed paths
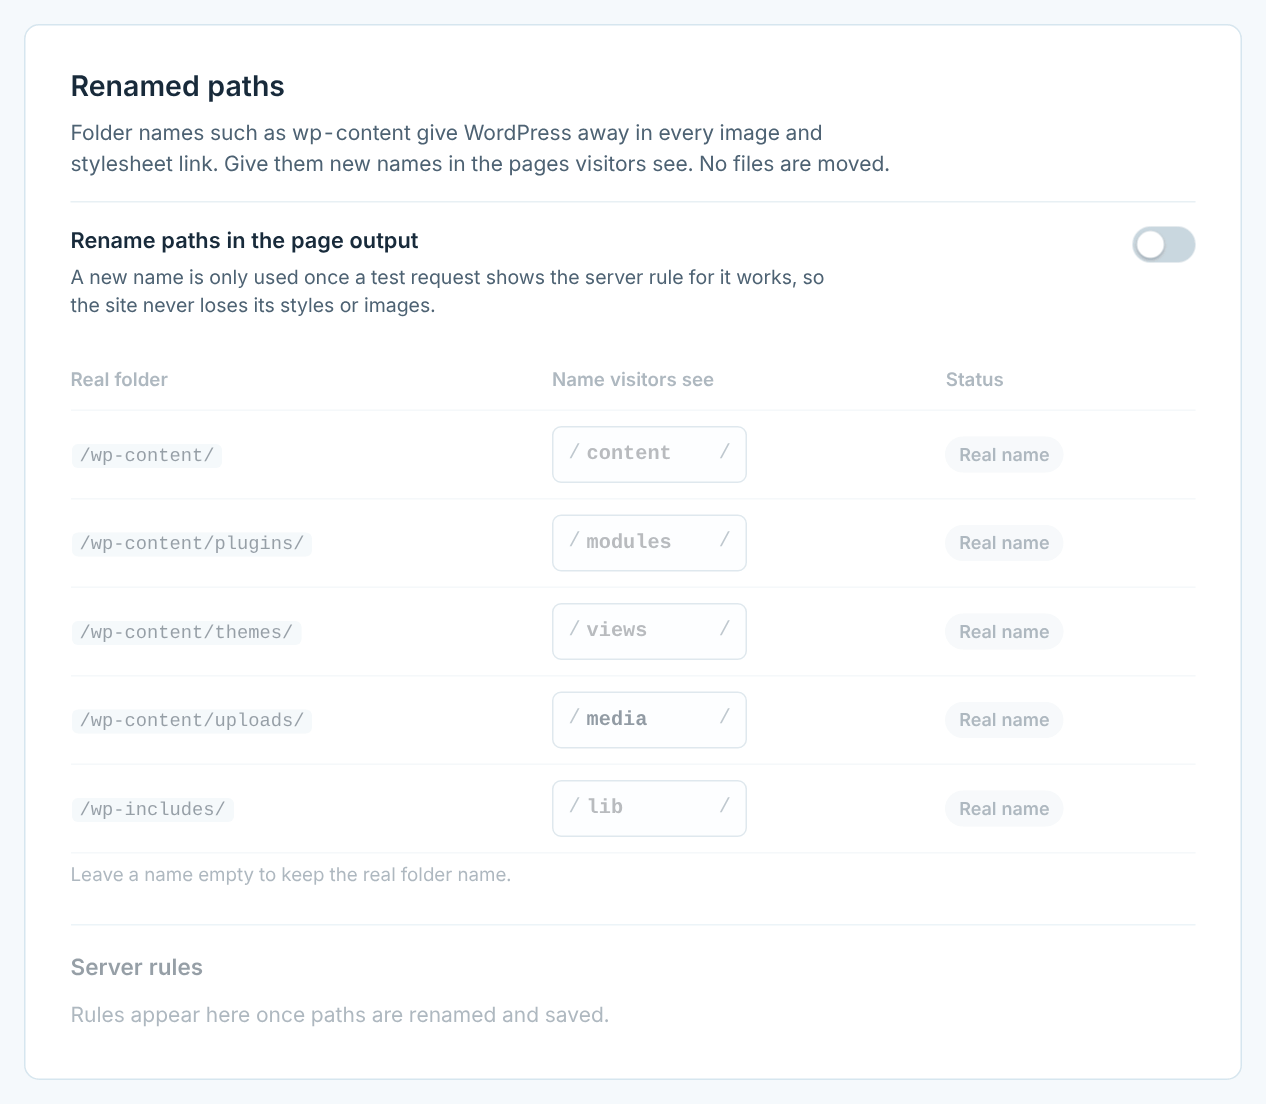
With Hide → Paths the folders WordPress normally shows in every page get new names in what visitors see: wp-content, plugins, themes, uploads and wp-includes. Nothing is moved on the server, and the block editor keeps saving the real addresses, so switching off is always safe.
- Apache and LiteSpeed: the rules are written to
.htaccessfor you. - Nginx: copy the rules shown on the tab into the
server { }block, reload Nginx, and press Test rules.
A new name is only used after a test request shows that the server rule works, so the site never loses its styles or images.
Protect
Login attempts and lockouts
Protect → Login attempts counts wrong passwords, unsolved CAPTCHAs and wrong two-factor codes on the WordPress and WooCommerce login forms. When an address reaches the limit, it is locked out for a while.
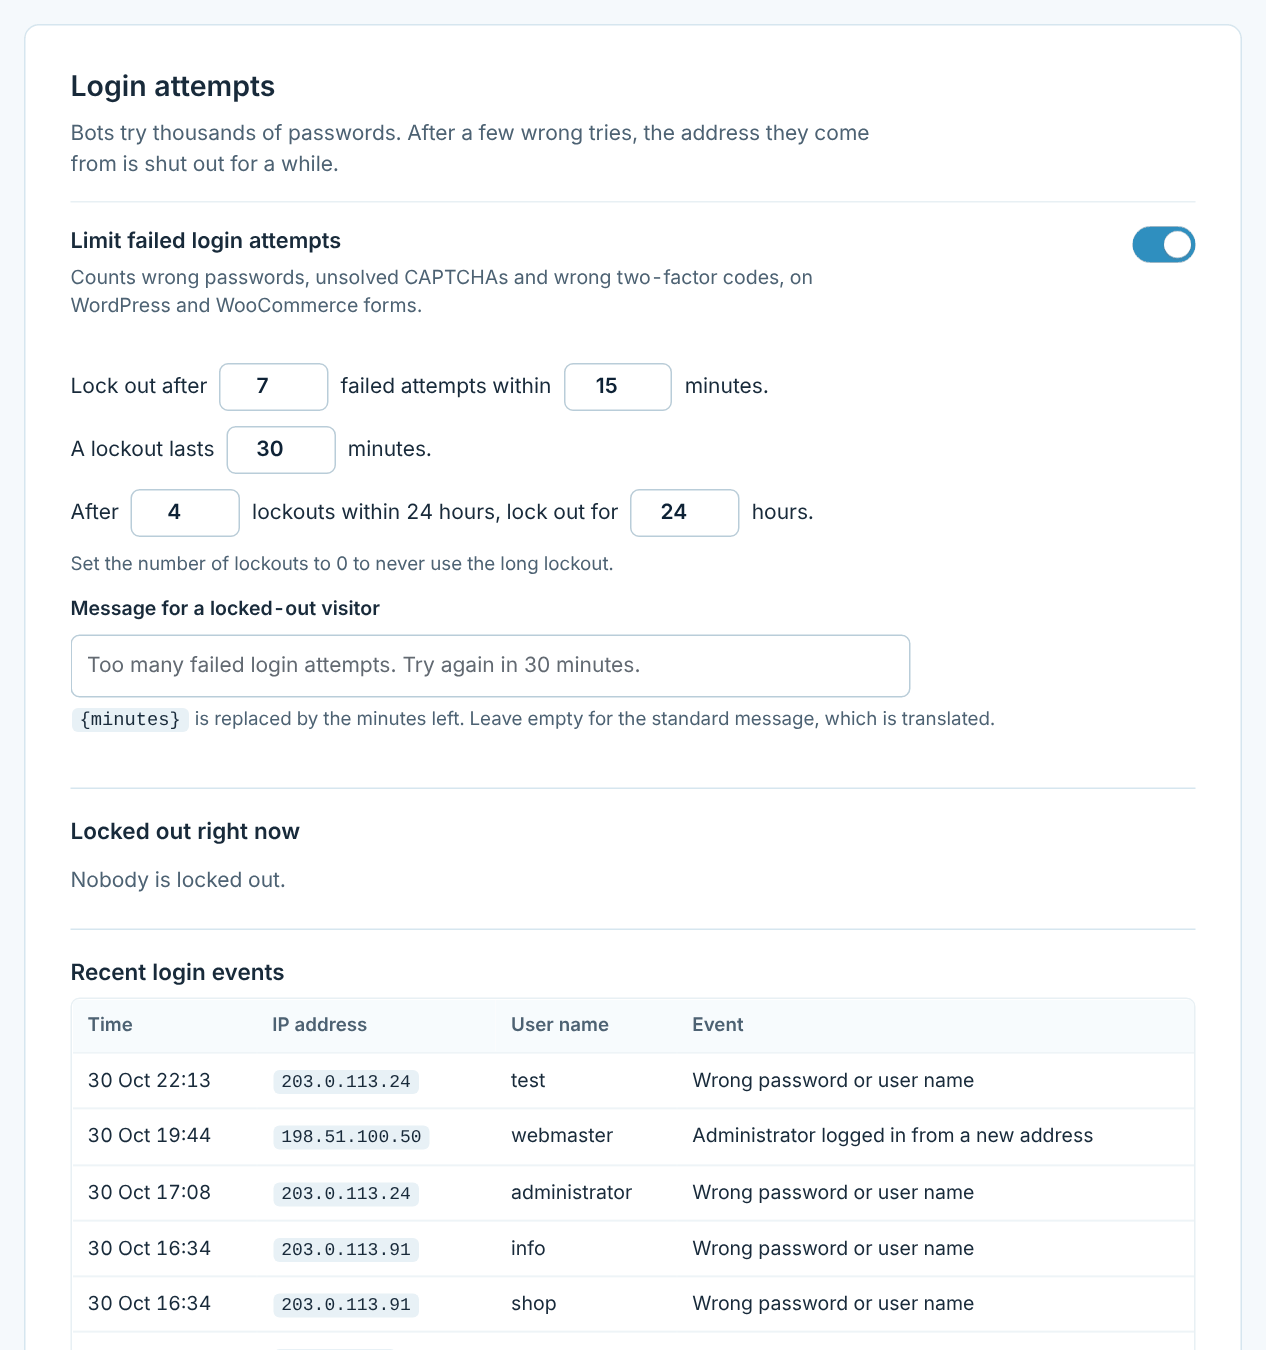
| Setting | Standard | Advice |
|---|---|---|
| Lock out after | 5 attempts within 15 minutes | 3–5 is fine for most sites. |
| Lockout lasts | 30 minutes | Long enough to stop scripts, short enough for a forgetful user. |
| Long lockout | After 4 lockouts in 24 hours, 24 hours | Stops slow, patient attacks. 0 switches it off. |
You can write your own message for locked-out visitors; {minutes} is replaced by the minutes left. Addresses locked out right now are listed at the bottom of the tab, where you can let one in again.
Protect
CAPTCHA
A small test on the forms stops scripts that guess passwords or create fake accounts. Choose the forms on Protect → CAPTCHA: login, registration and lost password, on WordPress and on WooCommerce.
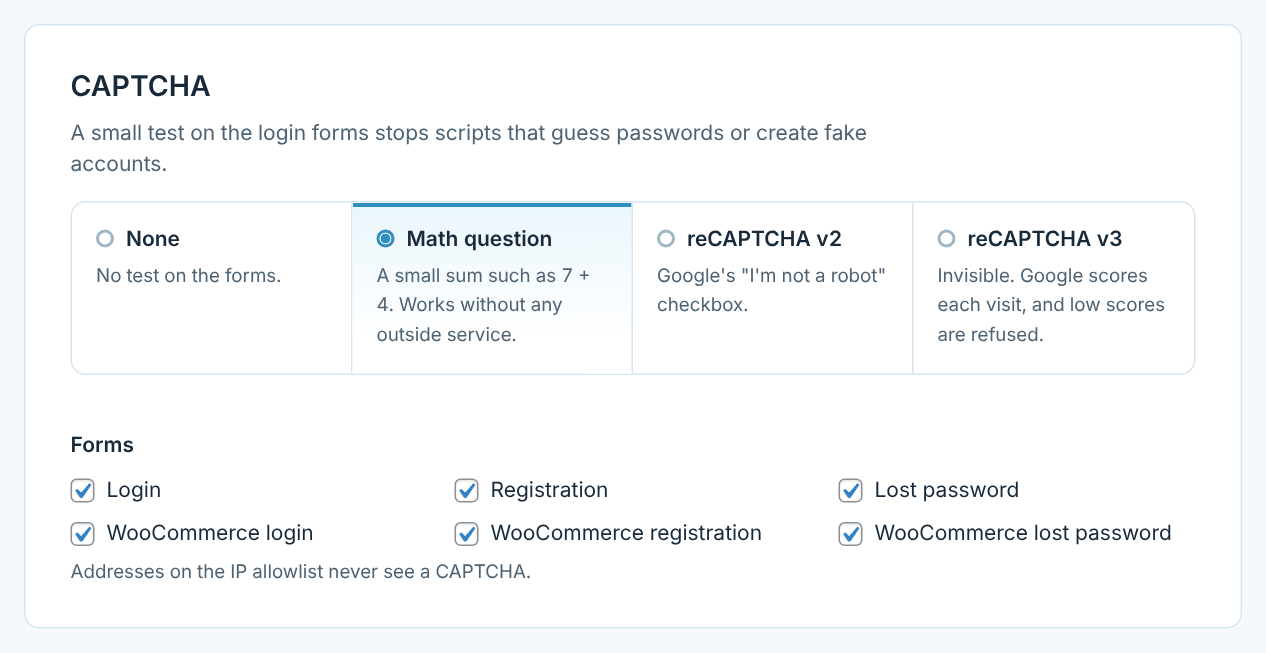
| Type | How it works | When to use it |
|---|---|---|
| Math question | A small sum such as 7 + 4. No outside service. | The safe default. Nothing is sent to anyone. |
| reCAPTCHA v2 | Google’s “I’m not a robot” checkbox. | When bots still get through the math question. |
| reCAPTCHA v3 | Invisible. Google scores each visit, and low scores are refused. | Shops where every extra click costs a sale. |
For reCAPTCHA, create keys at google.com/recaptcha/admin. v2 and v3 keys are different, so pick the same version there as here. For v3, 0.5 is Google’s suggested score; higher refuses more bots, and more people.
Protect
Two-factor login
After the password, users are asked for a code that only they can get, so a stolen password is not enough. Switch it on under Protect → Two-factor, and choose which methods users may use.
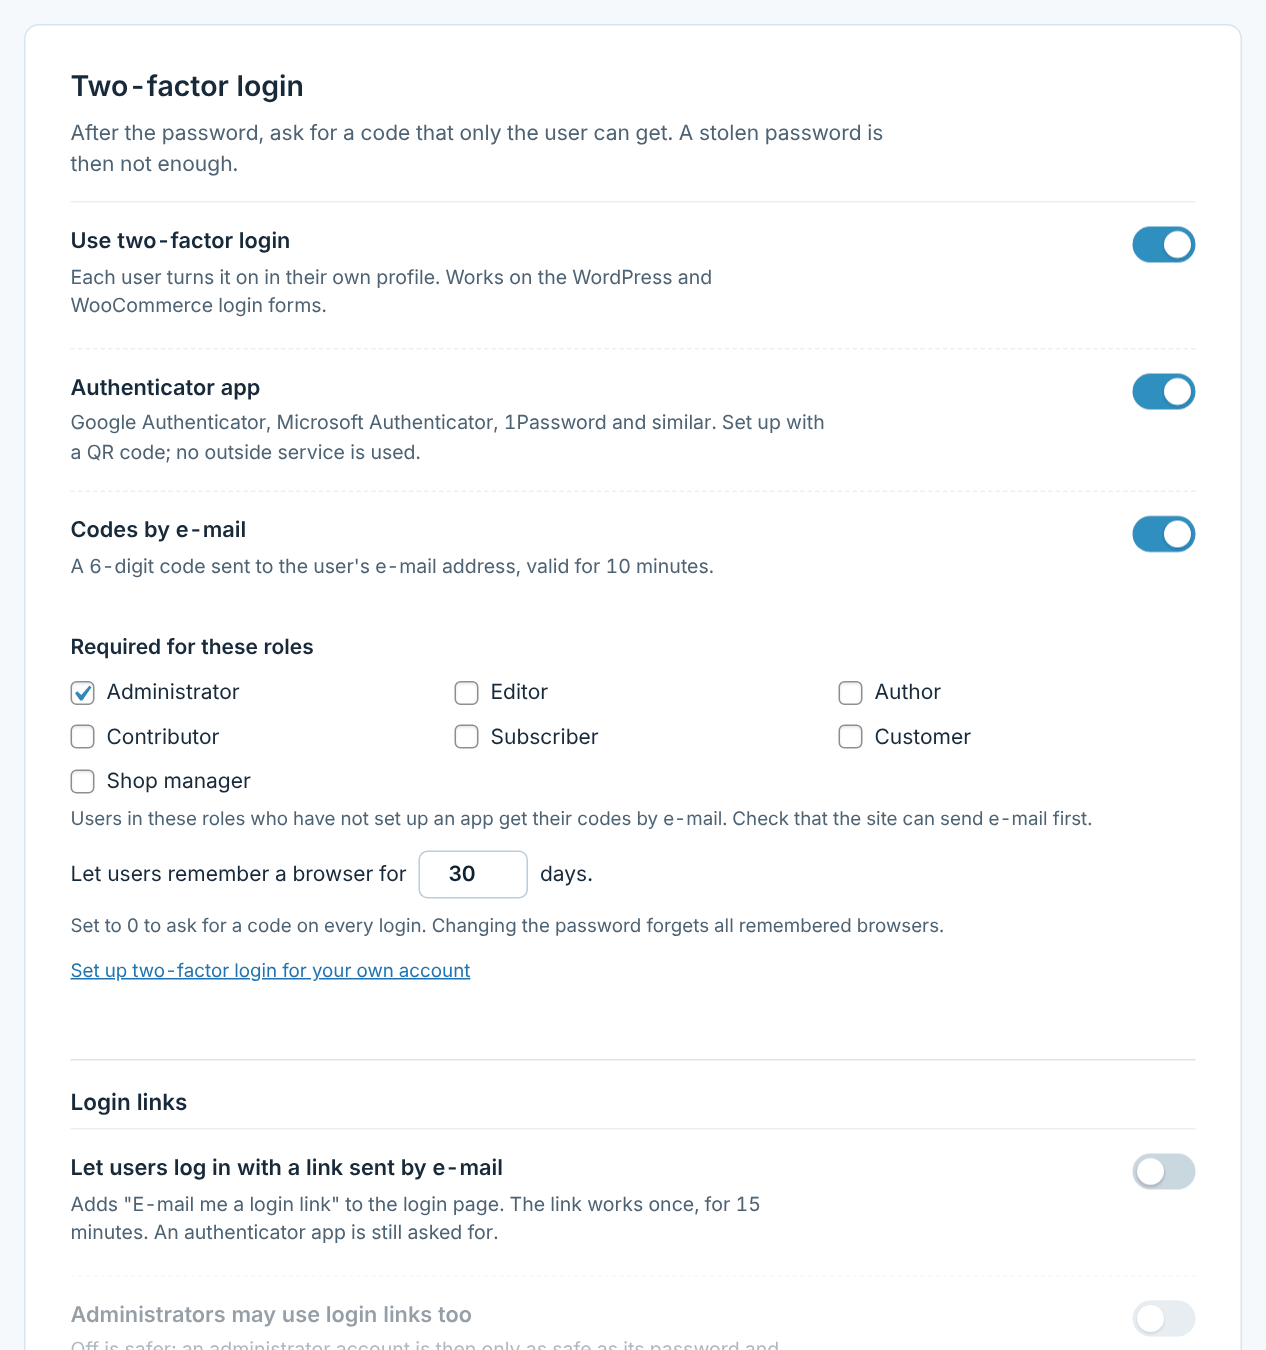
- Switch it on and keep both methods: authenticator app and codes by e-mail.
- Require it for administrators (and shop managers, if you have them). Users in these roles who have not set up an app get their codes by e-mail, so nobody is locked out.
- Set it up on your own profile: Users → Profile → Two-factor login. Scan the QR code with Google Authenticator, Microsoft Authenticator, 1Password or similar, and enter the code.
- Save the 10 backup codes somewhere safe. Each works once, for when your phone is not at hand.
“Remember this browser” skips the code on a trusted device for up to 30 days; set it to 0 to ask every time. Changing the password forgets all remembered browsers.
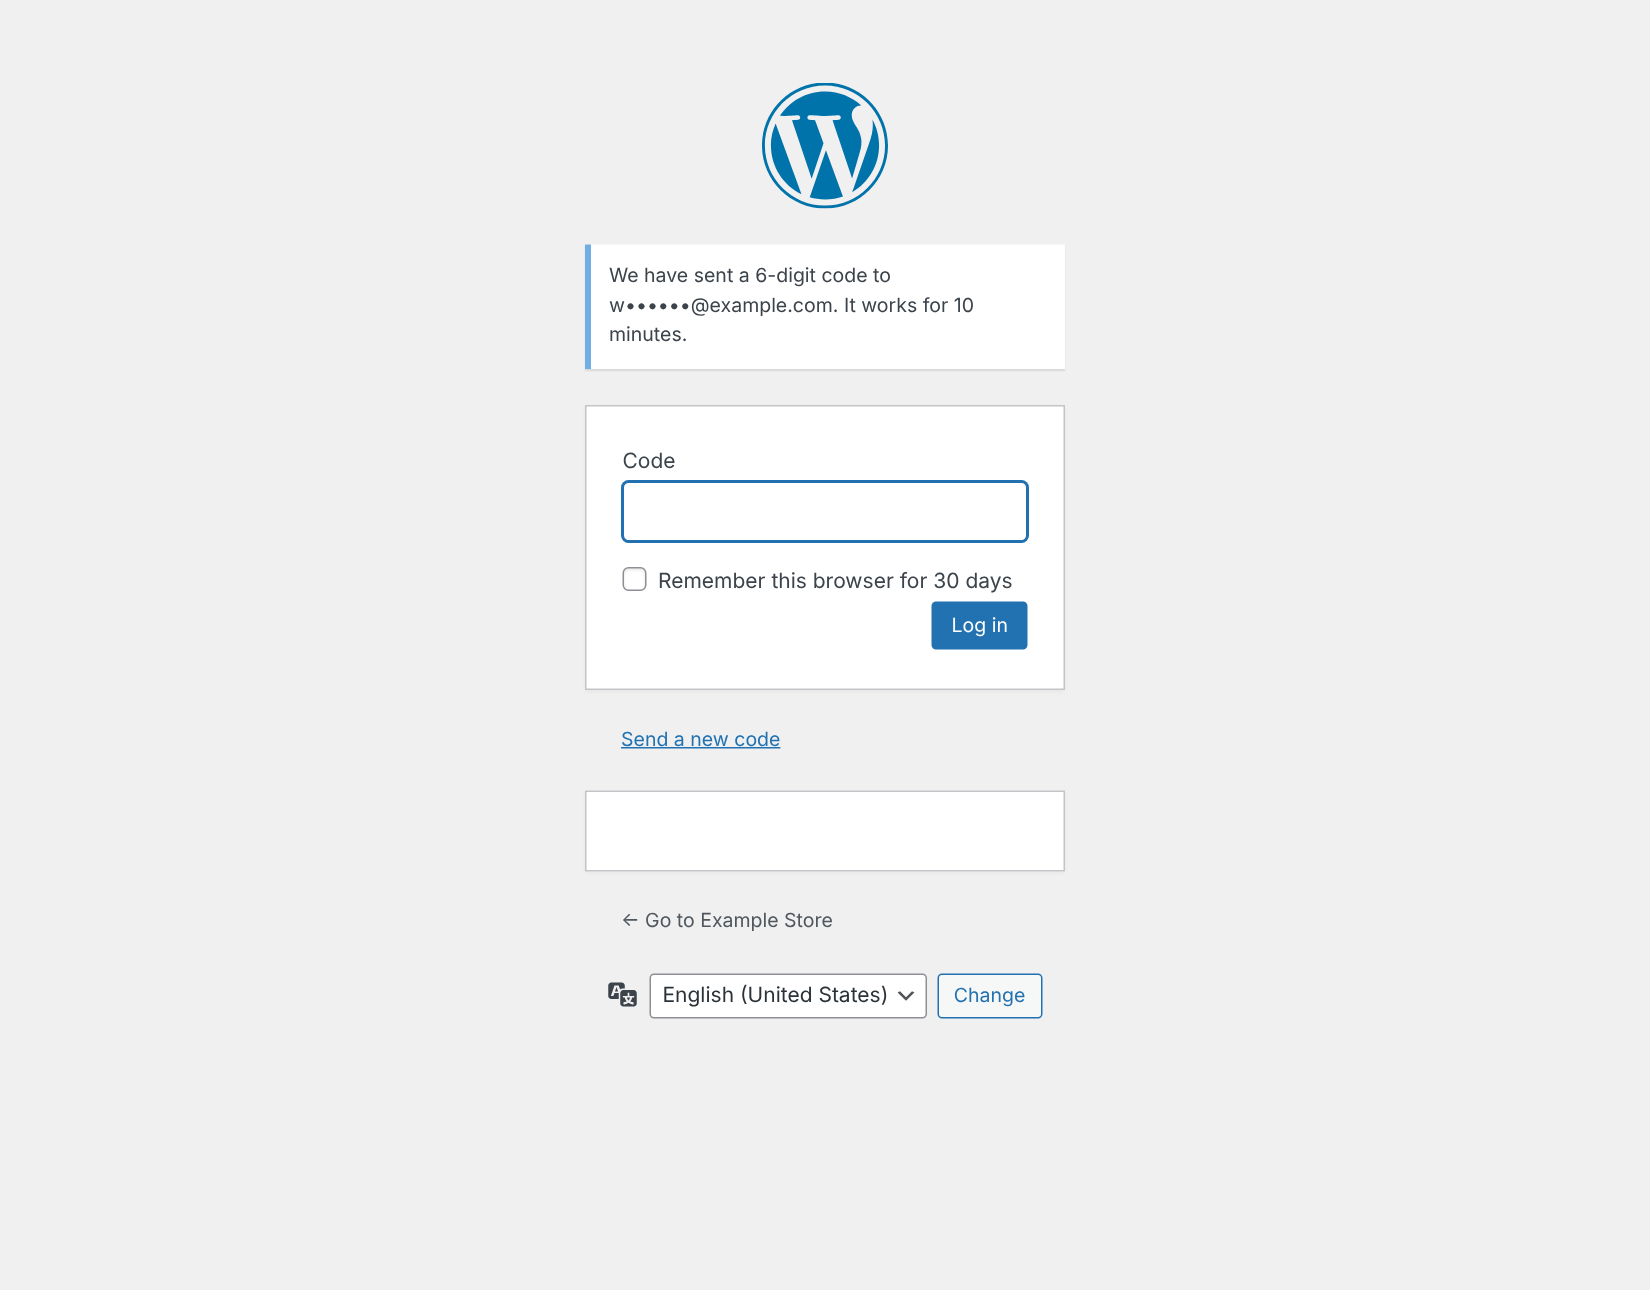
Login links by e-mail
Optional: adds “E-mail me a login link” to the login page. The link works once, for 15 minutes. Users with an authenticator app are still asked for a code. Administrators can only use links if you allow it.
Protect
IP lists
Protect → IP lists has an allowlist and a blocklist. One entry per line, with a comment after # if you like. These formats work:
- Single addresses:
203.0.113.7or2001:db8::1 - Ranges:
203.0.113.0/24,203.0.113.10-203.0.113.50or203.0.113.*
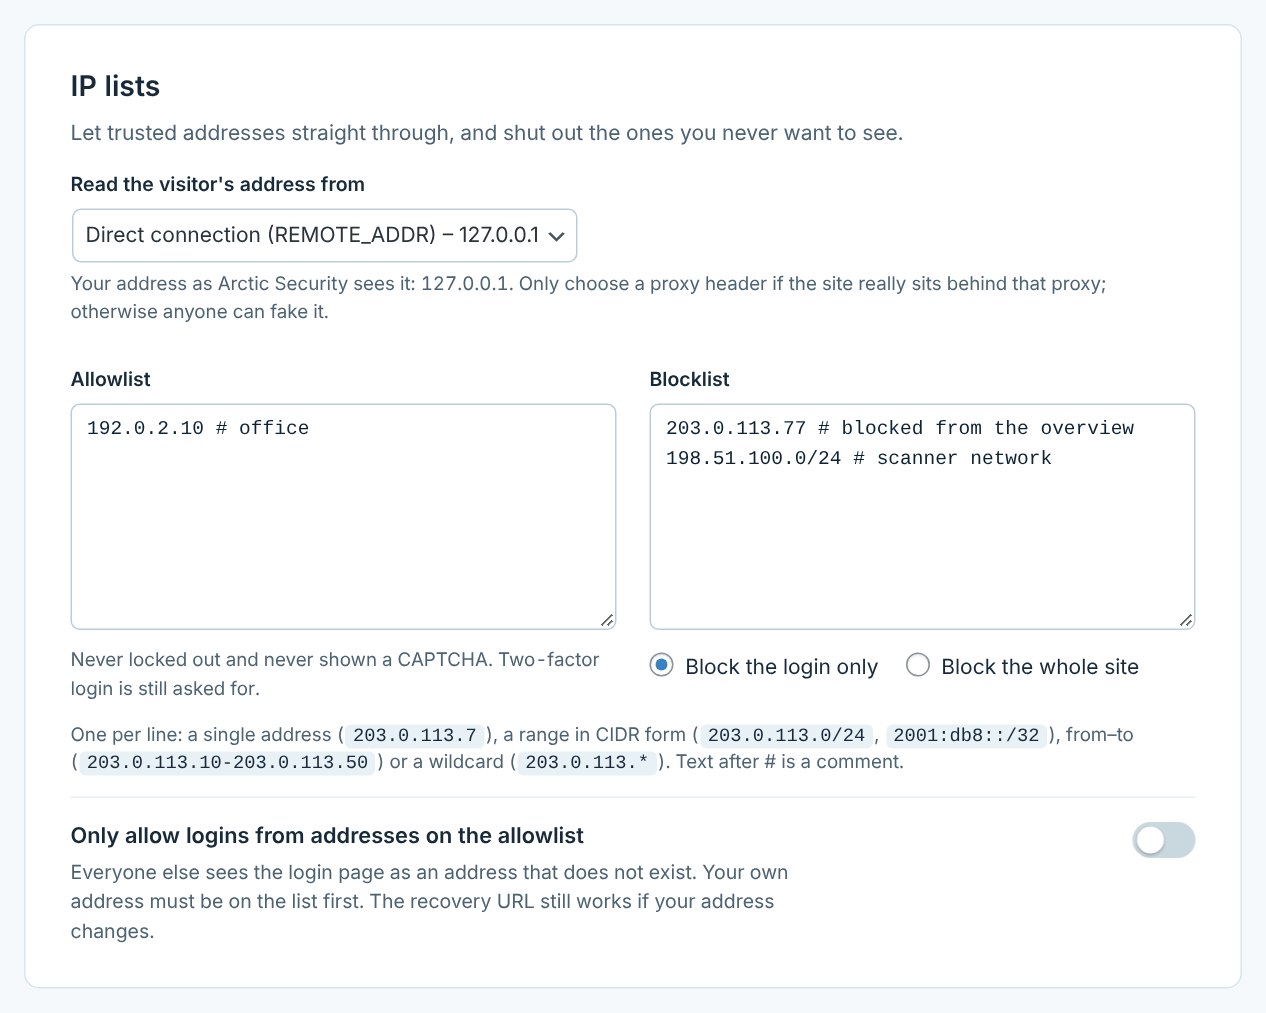
- Allowlist: these addresses are never locked out. With “Only allow logins from addresses on the allowlist” nobody else can log in at all – only for teams with fixed addresses.
- Blocklist: blocked addresses cannot log in, or cannot open the site at all if you choose “Block the whole site”.
- IP source: how the plugin reads the visitor’s address. “Direct connection” is right for most hosts. Behind Cloudflare choose Cloudflare, behind a proxy or load balancer choose X-Forwarded-For.
Your own address can never be blocked, and allowlist-only is refused if you are not on the list. You can also block an address with one click from the busiest addresses on the Overview.
Protect
Passwords
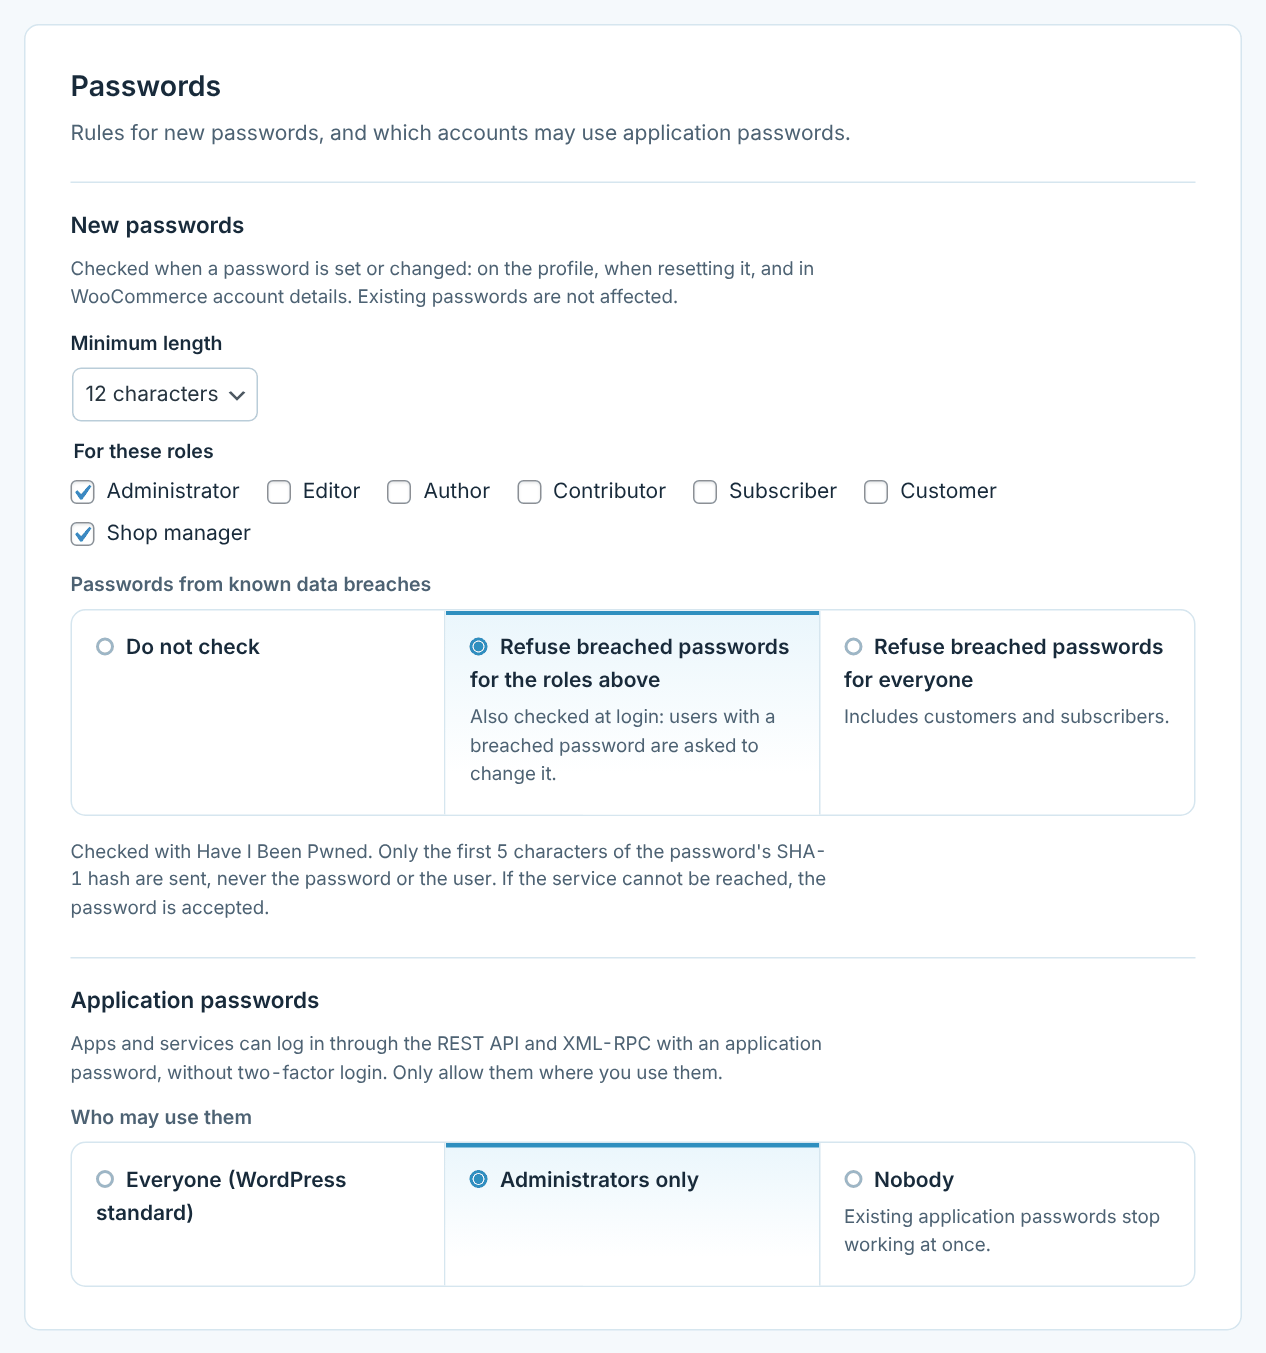
Protect → Passwords sets rules for new passwords. They are checked when a password is set or changed: on the user profile, when a password is reset, and in WooCommerce account details. Existing passwords are not affected until they are changed.
| Setting | Standard | Advice |
|---|---|---|
| Minimum length | 12 characters for administrators | Add shop managers and editors if they can do real damage. Length matters more than odd characters. |
| Passwords from known data breaches | Do not check | “Refuse for the roles above” is a good choice for most sites. |
| Application passwords | Everyone | “Administrators only”, or “Nobody” if no app or service logs in that way. |
Breached passwords
The check uses Have I Been Pwned. Only the first 5 characters of the password’s SHA-1 hash leave the site; the service answers with every hash that starts the same way, and the plugin compares them itself. If the service cannot be reached, the password is accepted. At login, the password is checked once: users with a breached password see a message in the dashboard until they change it.
Application passwords
Apps and services, such as the WordPress mobile app or an accounting integration, can log in through the REST API and XML-RPC with an application password – without two-factor login. Allow them only for those who need them. “Nobody” also stops existing application passwords at once.
Protect
Users and sessions
Protect → Users and sessions lists every account that can change the site: administrators, editors and shop managers, with their last login, two-factor login, application passwords and sessions.
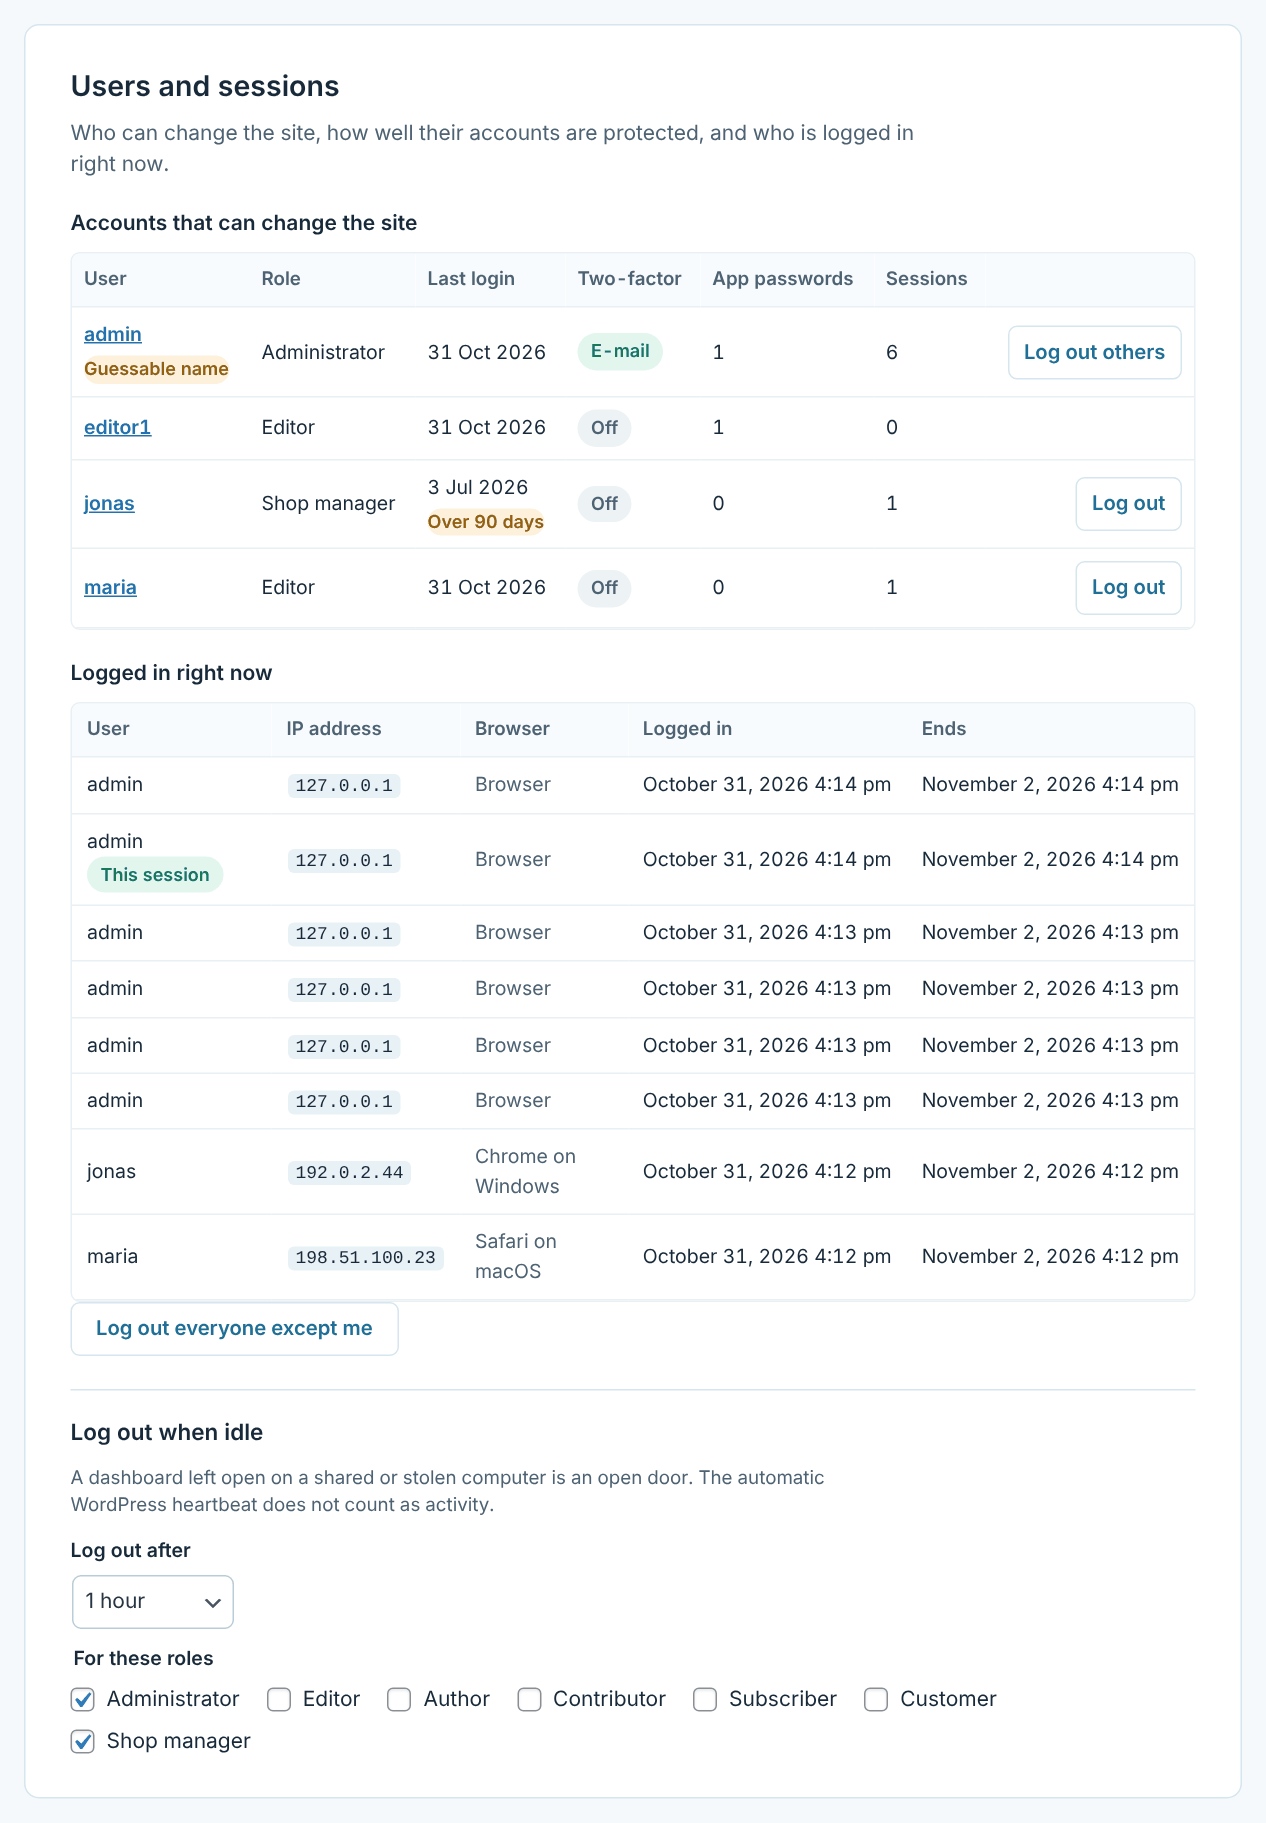
- Guessable name marks a user called “admin” – the first name bots try.
- Over 90 days marks accounts that have not logged in for a long time. Remove them or lower their role; forgotten accounts are an easy way in.
- Breached password marks users whose password was found in a data breach at login.
Under Logged in right now you see every session with address, browser and when it ends. Log out ends all sessions of one user; Log out everyone except me ends all sessions but your own.
Log out when idle
Choose how long a user of the selected roles may be inactive before being logged out – for example one hour for administrators. The automatic WordPress heartbeat in an open dashboard does not count as activity. The user is sent to the login page with a short explanation.
Harden
The security check
Harden → Security check tests the site from the outside, the way an attacker would see it, and scores it from 0 to 100. Every point is explained in plain words.
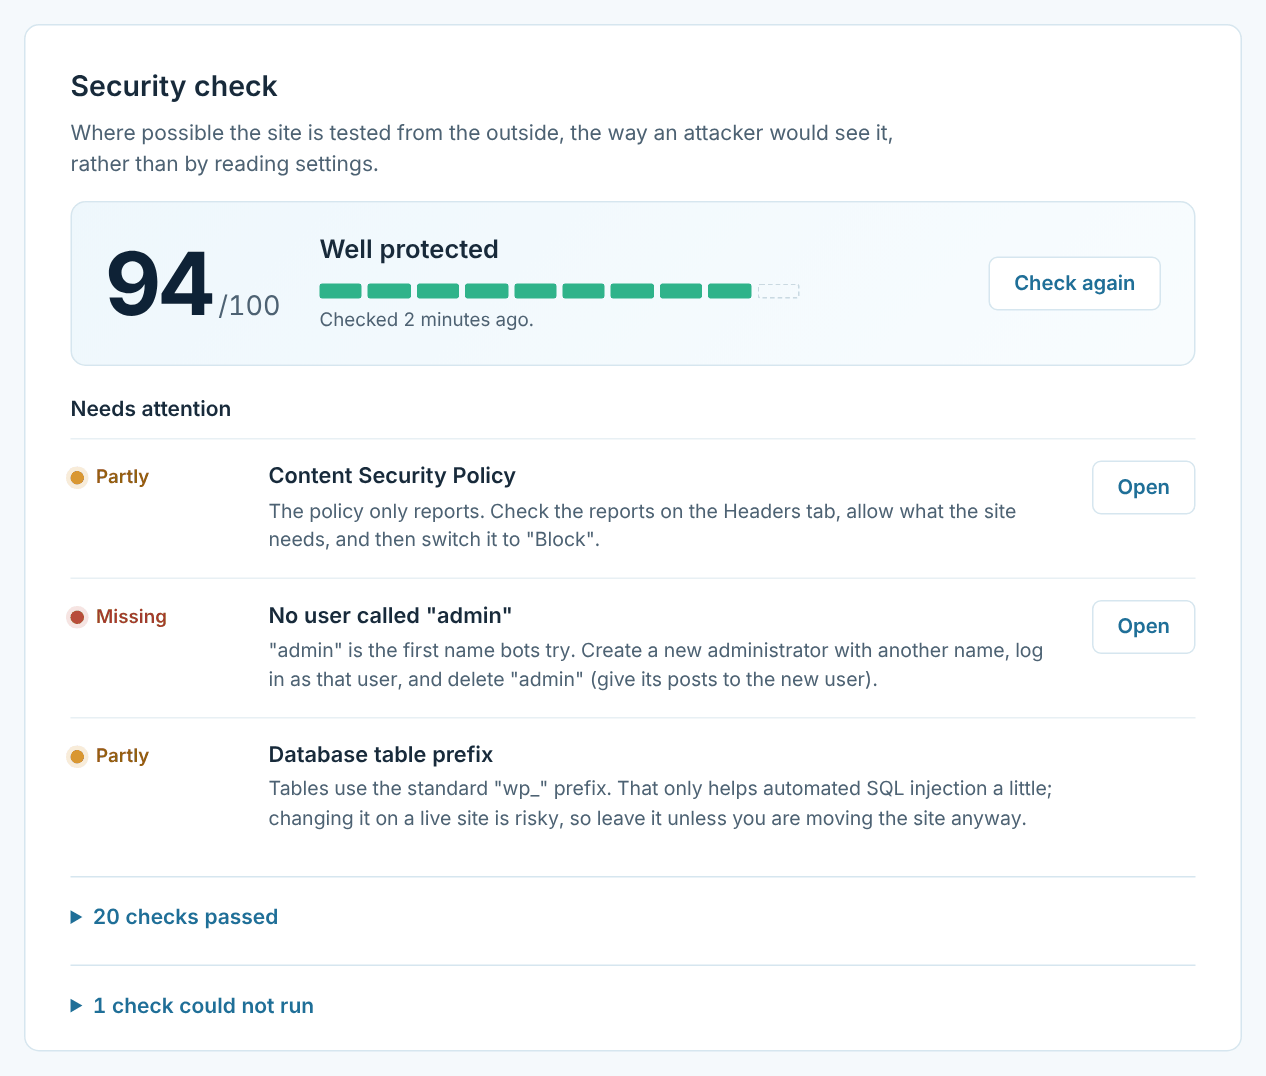
- Fix appears where a fix is safe: it cannot lock anyone out or change an address. The button at the top (“Fix 3 items”, for example) does all of them in one go.
- Open takes you to the setting when the change needs your decision, such as a new login address.
- Some points are outside the plugin: updates, the PHP version, a user called “admin” or the database table prefix. The text says what to do.
90 or more is very good. Run the check again after changes; the score also shows in the header and in the weekly summary.
Harden
Security headers and HTTPS
Security headers are small instructions sent with every page that tell the browser to be stricter. Visitors do not see them. On Apache they are also written to .htaccess, so images and files get them too.
| Header | Recommended | What it does |
|---|---|---|
| X-Content-Type-Options | On | Browsers do not guess file types, so an uploaded text file cannot run as a script. |
| X-Frame-Options | SAMEORIGIN | Other sites cannot show your pages in a frame. DENY breaks the Customizer preview. |
| Referrer-Policy | strict-origin-when-cross-origin | Other sites only see your domain, not the full address, when visitors follow a link. |
| Permissions-Policy | On | Switches off camera, microphone, location and similar features the site does not use. |
| Cross-Origin-Opener-Policy | same-origin-allow-popups | Keeps your pages away from windows opened by other sites. same-origin can break login and payment pop-ups. |
| Cross-Origin-Resource-Policy | same-site | Other sites cannot load your pages as images or scripts. Sent with pages only, so images still work in newsletters. |
| X-Powered-By | Removed | Stops the server from telling everyone its PHP version. |
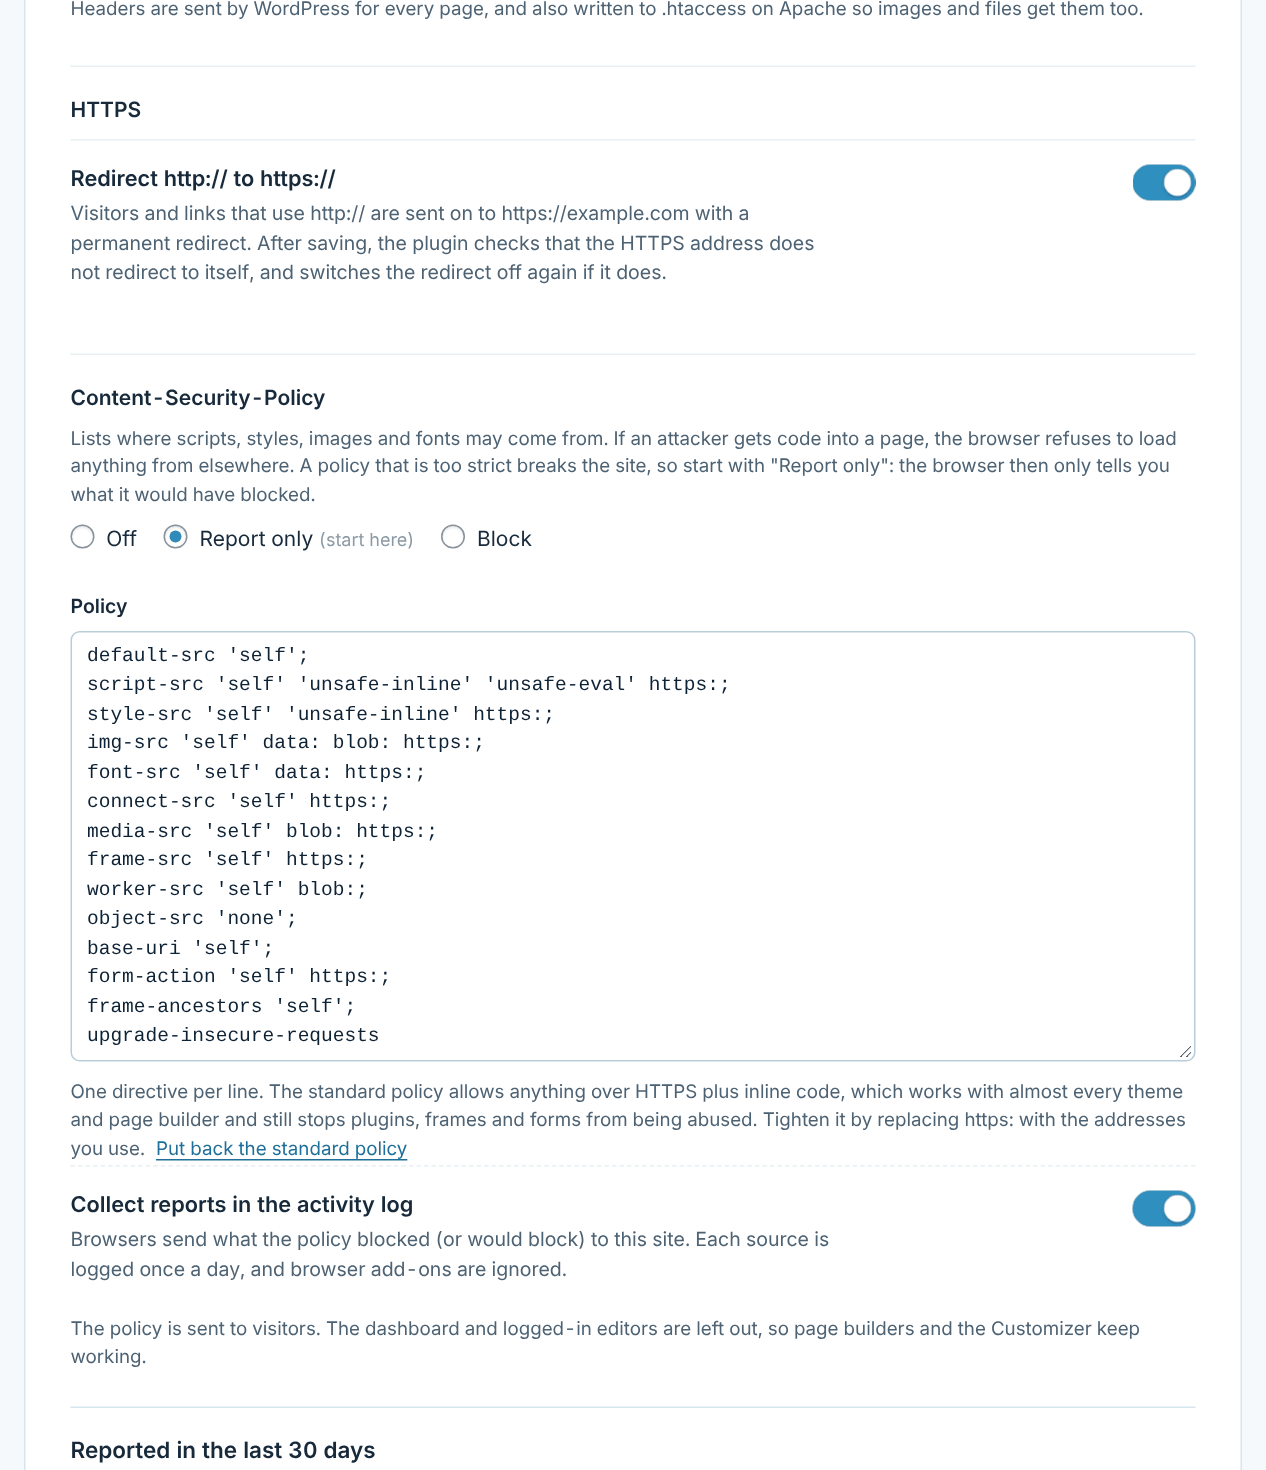
HTTPS in the right order
- Make sure the site has a certificate and that both addresses under Settings → General start with
https://. - Open the dashboard over https:// and switch on Redirect http:// to https://. The plugin checks that the HTTPS address does not redirect to itself, and switches the redirect off again if it does.
- Check that every page works, then switch on HSTS. Start with “1 day (to test)” if you are unsure, and move to one year when all is well.
- Only use “Include subdomains” and “Allow preloading” when every subdomain has HTTPS for good: browsers remember them for a long time.
X-Forwarded-Proto: https header, or use the host’s own “force HTTPS” setting instead.Harden
Content Security Policy, step by step
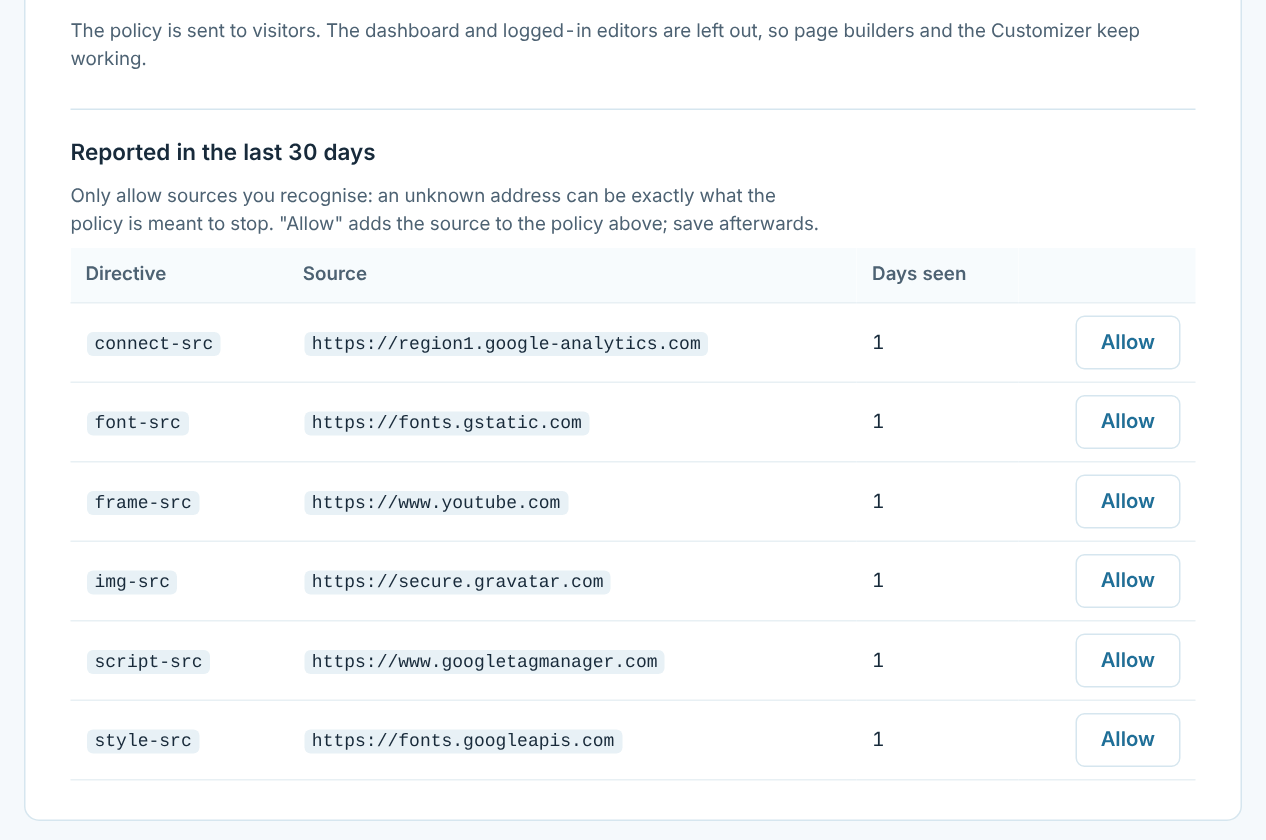
A Content Security Policy lists where scripts, styles, images and fonts may come from. If an attacker gets code into a page, the browser refuses to load anything from elsewhere. A policy that is too strict breaks the site, so go step by step.
- Start with “Report only” and the standard policy. It allows anything over HTTPS plus inline code, which works with almost every theme and page builder, and still stops plugins, frames and forms from being abused.
- Keep “Collect reports in the activity log” on and browse the site in a private window: front page, shop, checkout, contact form. Browsers report what the policy would have blocked.
- Look at “Reported in the last 30 days” on the Headers tab after a few days. Click Allow next to the sources you recognise, and save.
- Switch to “Block” when no new reports come in. Check the site again in a private window.
Strict scripts: no ‘unsafe-inline’
The standard policy still lets inline scripts run, and that is how most attacks run their code. Security scanners warn about it as “‘unsafe-inline’ and ‘unsafe-eval’ in script-src”. Under Scripts, choose Strict: only scripts with a nonce (WordPress 6.4 or newer):
- Every script that WordPress, the theme and plugins print gets a new one-time code (a nonce) on every page. Scripts hidden in posts, comments or form fields get none, so they never run.
- The script-src line in the policy is replaced by a strict one with ‘strict-dynamic’. Scripts with the nonce may load the scripts they need, so you do not have to list addresses.
- Event handlers that the theme or plugins print, such as
onload="this.media='all'", are allowed one by one by their hash. - Allow eval() stays off unless the reports show
'unsafe-eval'.
Go the same way as above: choose Strict while the policy is in Report only, browse the site in a private window – including the cart and checkout – and look at the reports. “A script without the nonce” means a script printed straight into the content, often by a page builder widget or a pasted tracking code. Move it to a plugin that adds scripts properly, such as a code snippets plugin, and then switch to Block.
Tightening the policy
For a stricter policy, replace https: in a directive with the addresses you actually use. Common ones:
| Service | Add to |
|---|---|
| Google Fonts | style-src https://fonts.googleapis.com and font-src https://fonts.gstatic.com |
| Google Analytics / Tag Manager | script-src https://www.googletagmanager.com and connect-src https://*.google-analytics.com |
| YouTube embeds | frame-src https://www.youtube-nocookie.com https://www.youtube.com |
| Stripe | script-src https://js.stripe.com and frame-src https://js.stripe.com |
Harden
Firewall
Harden → Firewall refuses typical attack requests before WordPress handles them. Each group can be switched on and off on its own:
- SQL injection – for example
UNION SELECTin the address - Cross-site scripting (XSS) – script tags and
javascript:in the address - File paths and remote files –
../,/etc/passwdand stream wrappers - Known attack tools – scanners such as sqlmap, nikto and wpscan
- Unusual request methods – TRACE, TRACK, DEBUG and CONNECT
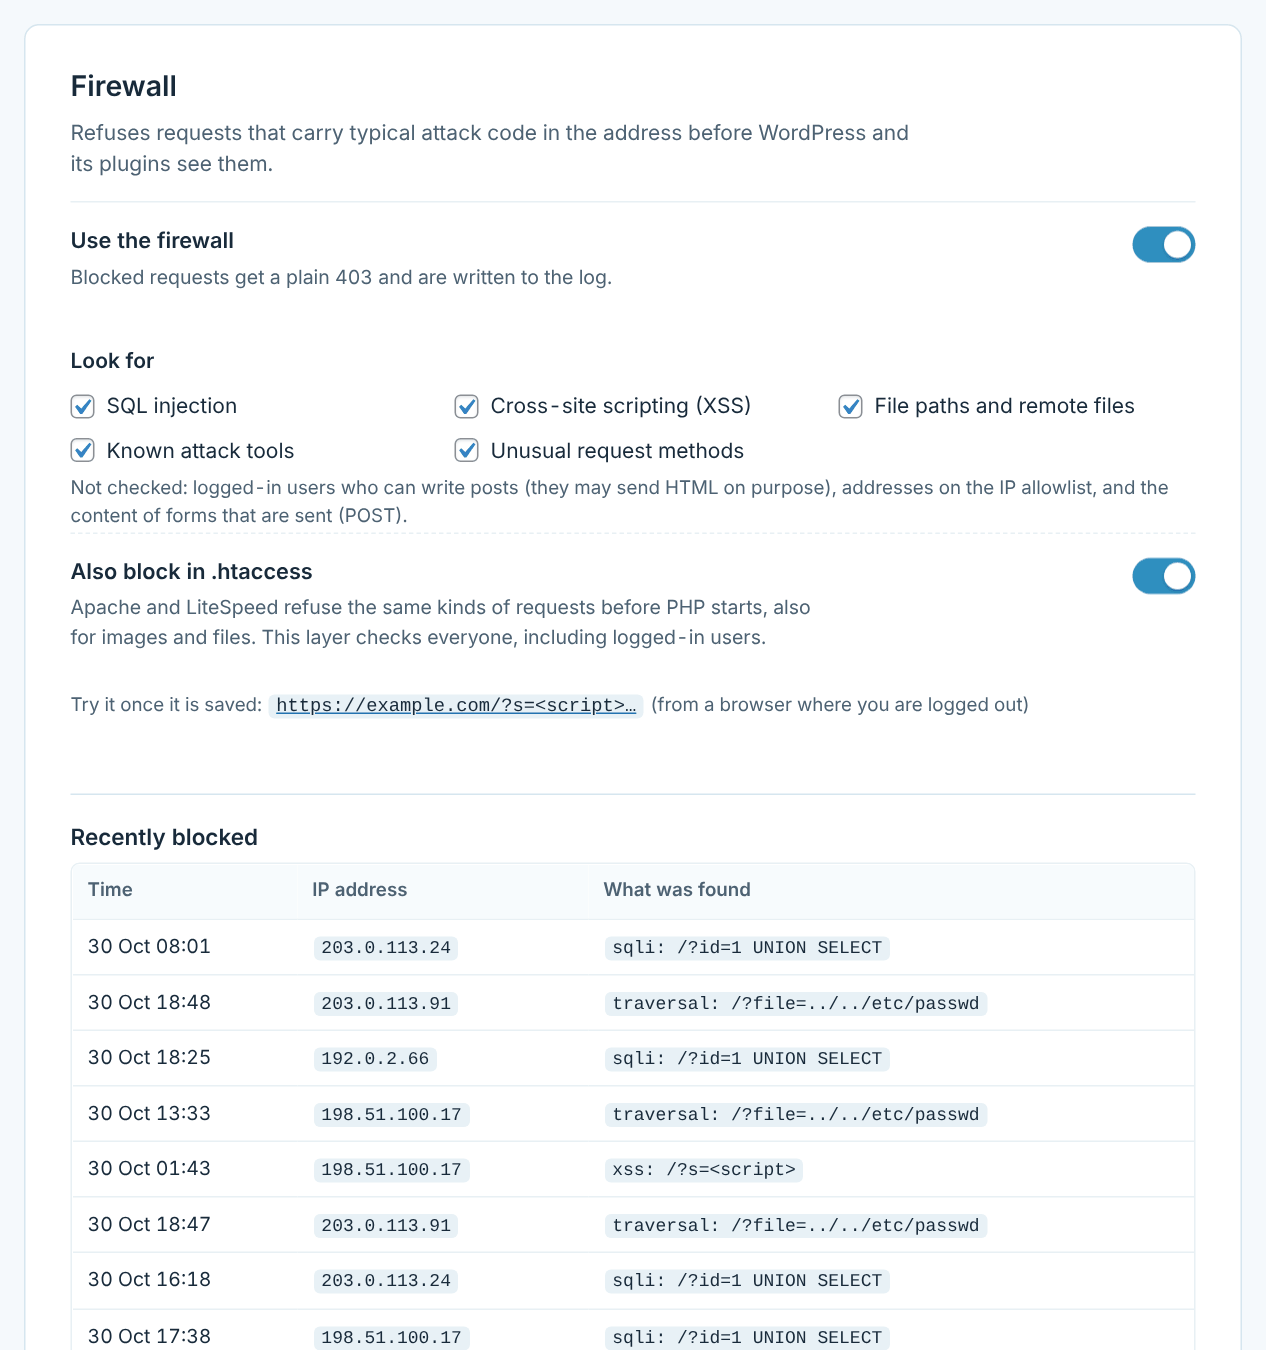
“Also block in .htaccess” refuses the same requests on Apache and LiteSpeed before PHP even starts. Logged-in editors are not checked by the PHP firewall, so writing about SQL in a post never gets blocked; the .htaccess layer checks everyone. Blocked requests appear in the activity log.
Harden
Scan guard
Bots look for weak spots: /.env files with passwords, /.git folders, backups such as backup.zip or wp-config.php.bak, old installers, and hundreds of addresses that do not exist. Harden → Scan guard shuts them out of the whole site for a while.
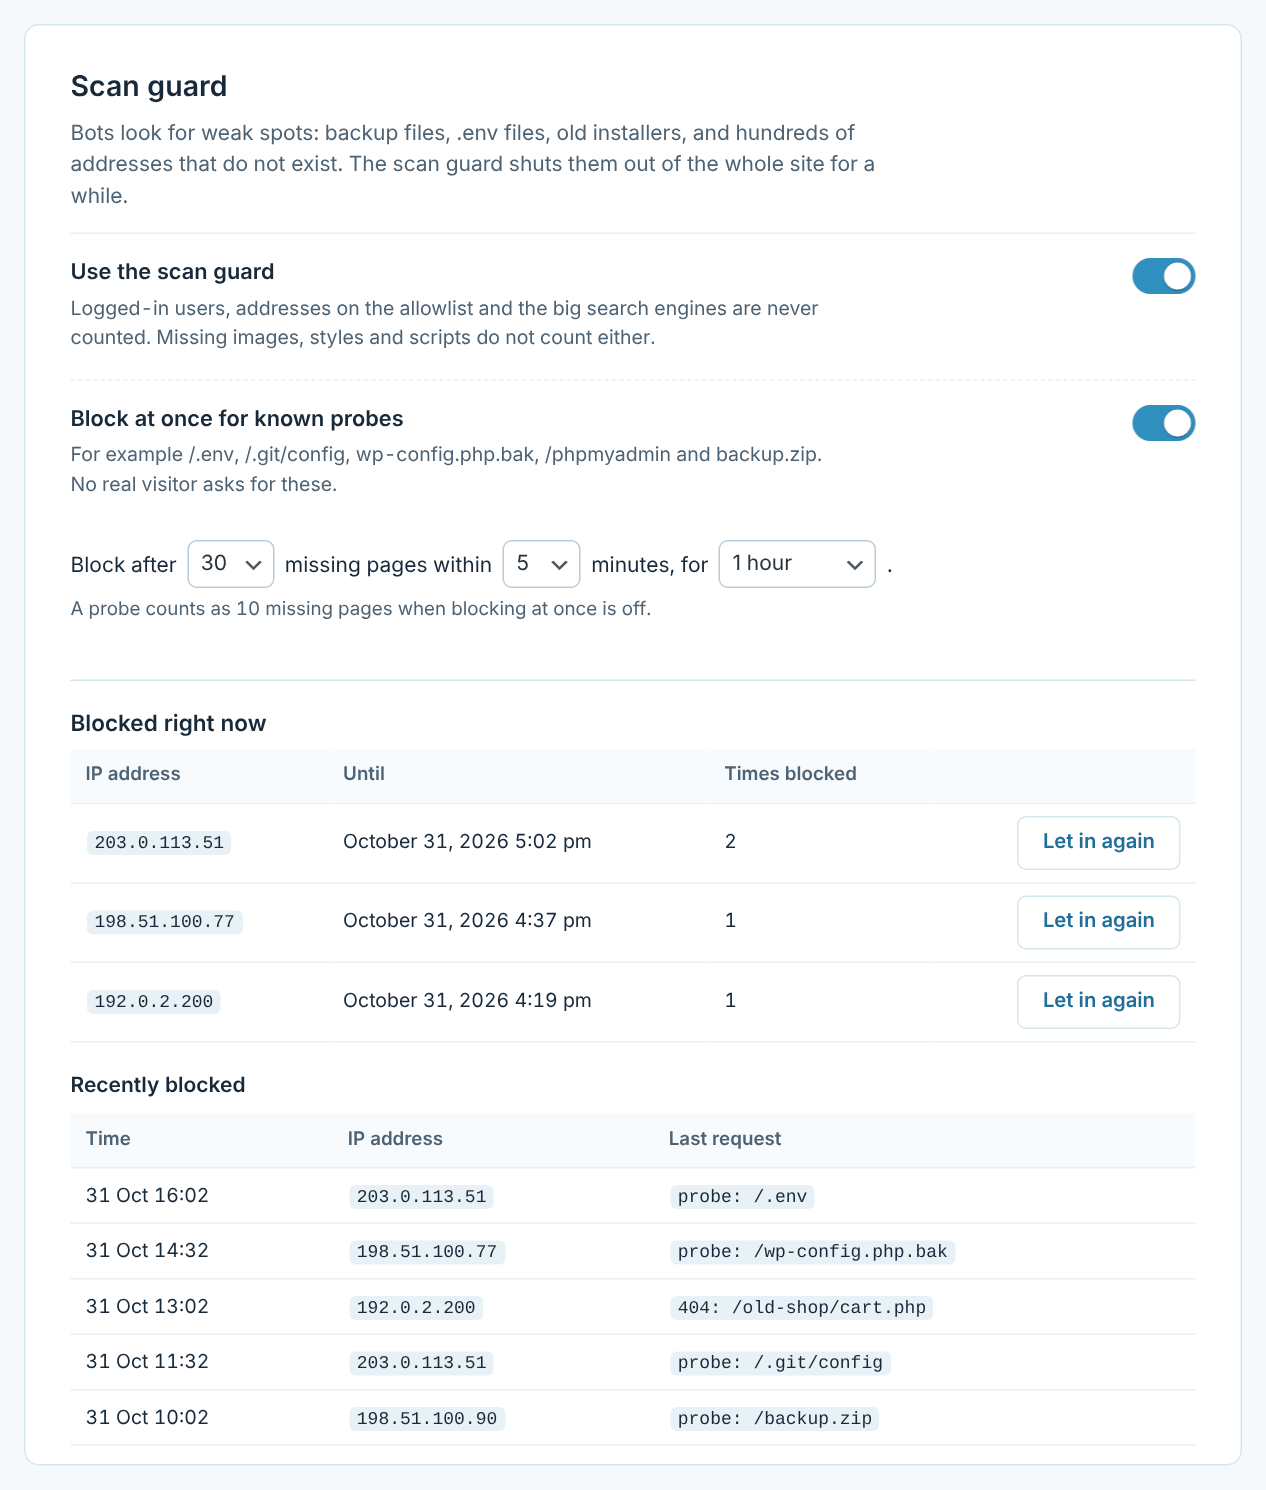
- Block at once for known probes: a request for one of the typical scanner paths blocks the address straight away. No real visitor asks for them.
- Missing pages: standard is 30 within 5 minutes, then a block for 1 hour. The hidden login and admin addresses count as missing pages too.
- Never counted: logged-in users, addresses on the allowlist, the big search engines, and missing images, styles and scripts – so a page with a broken image never blocks real visitors.
Blocked addresses are listed with Let in again, and the last requests show what they were looking for. Blocks also appear in the activity log under Firewall and scanners.
Harden
Files and AI crawlers
Harden → Files closes the doors a standard WordPress install leaves open:
- Block PHP in the uploads folder: if an attacker manages to upload a PHP file, it will not run.
- Switch off folder listings: folders without an index page are not listed.
- Hide readme.html, license.txt and other give-away files: also wp-config-sample.php, the installer and a public debug.log.
- Switch off the theme and plugin editor: nobody can change PHP code from the dashboard.
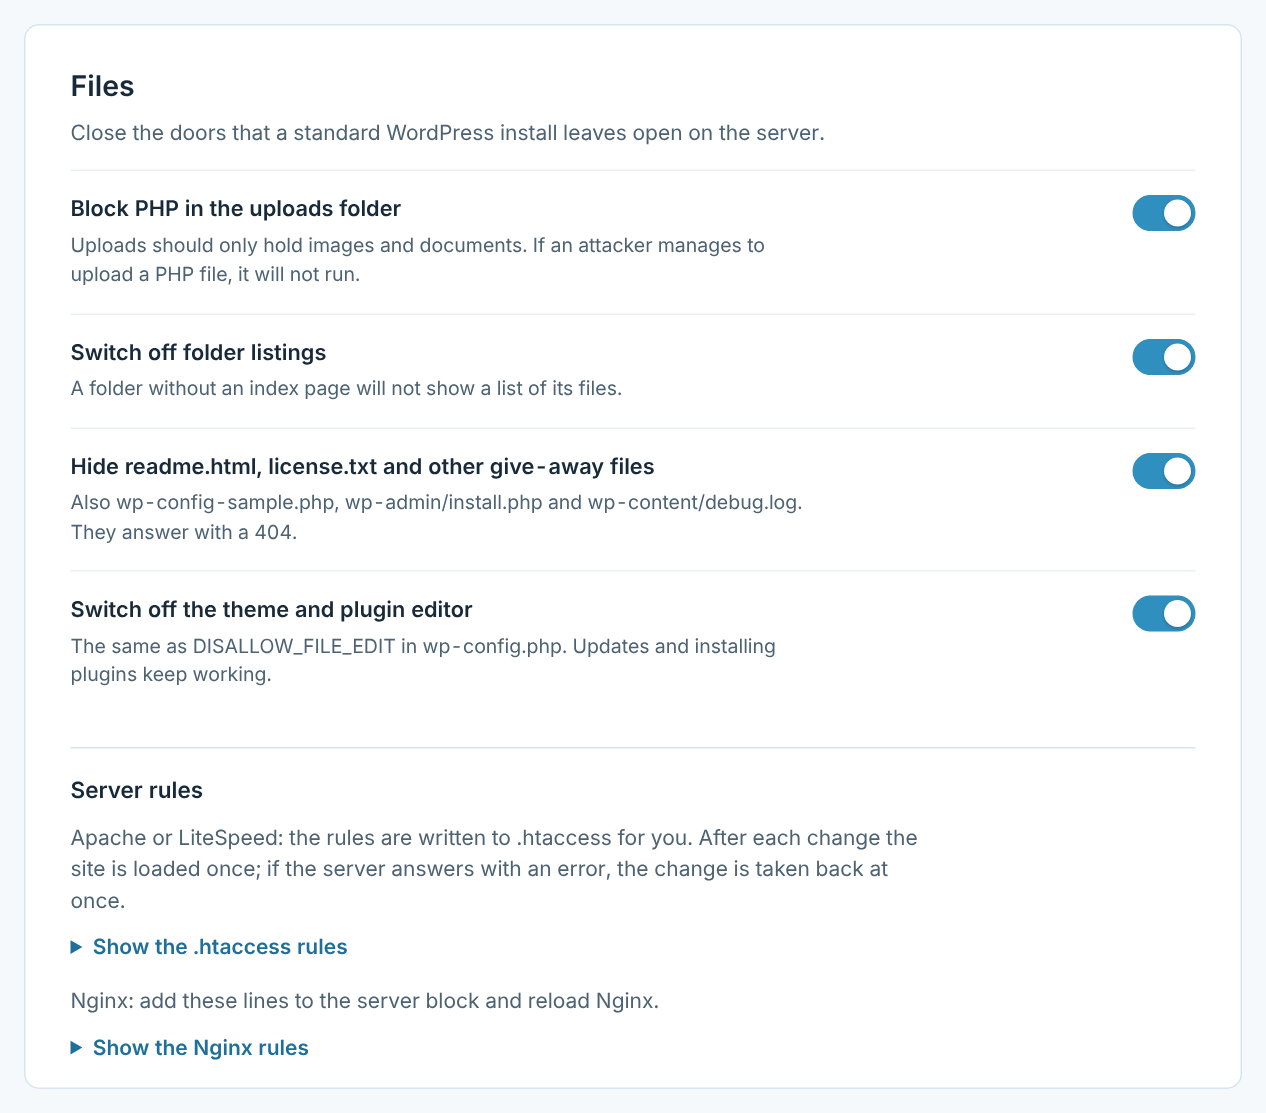
If the host does not allow some lines in .htaccess (often Options), the site answers with an error after saving. The plugin notices it, takes the rules back at once and tells you. The PHP part of the protection keeps working.
AI crawlers
Harden → AI crawlers asks crawlers that collect text for AI training to stay away: in robots.txt only (polite crawlers obey it), or blocked outright with a 403. Choose the crawlers in the list, and add others by name. AI search crawlers that send visitors to your site can be left open.
Monitor
Overview and activity log
The Overview is the first thing you see: the security score, the last 7 days compared with the week before, a 14-day chart of attacks, the state of every protection and the busiest attacking addresses, which you can block with one click.
The Activity log writes down logins, failed attempts, lockouts, blocked requests, and changes to plugins, themes, users, roles and settings – with who did it, also when it was done with WP-CLI.
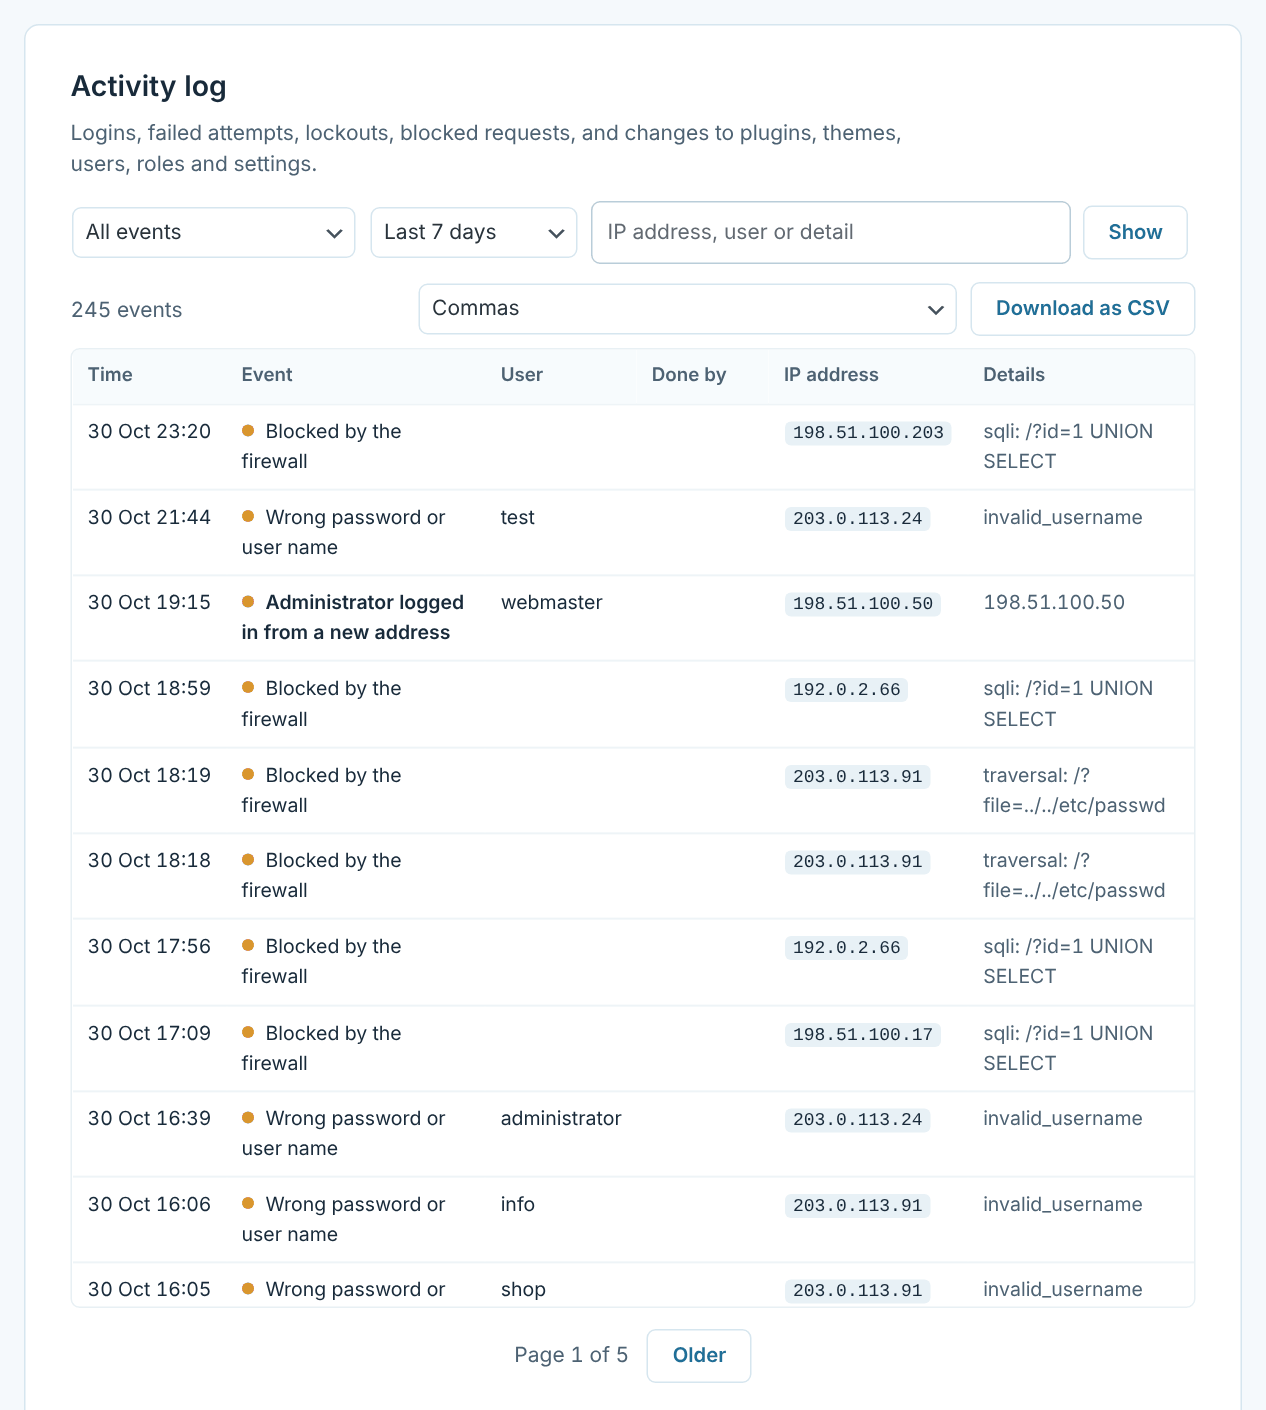
- Filter by kind (logins, firewall, CSP, users, plugins, themes, settings), by period and by text such as an IP address or a user name.
- Download as CSV for Excel. On Danish and most European sites it uses semicolons, so Excel opens it in columns. Cells that look like formulas are made harmless.
- Keep events for 30, 90 or 180 days or a year. The log stores IP addresses, which count as personal data, so keep it no longer than you need. 90 days is the default.
Monitor
E-mail alerts and the weekly summary
Monitor → Alerts sends an e-mail when something happens that you would want to know about at once. Choose which:
- A new administrator, or a user made administrator
- An administrator logging in from an address not seen on that account before
- Plugins installed, switched on or off, or deleted (updates are not mailed)
- Themes installed, switched or deleted
- Protection paused, settings imported, or the site address or administration e-mail changed
- An address locked out (off by default: can be many on a busy site)
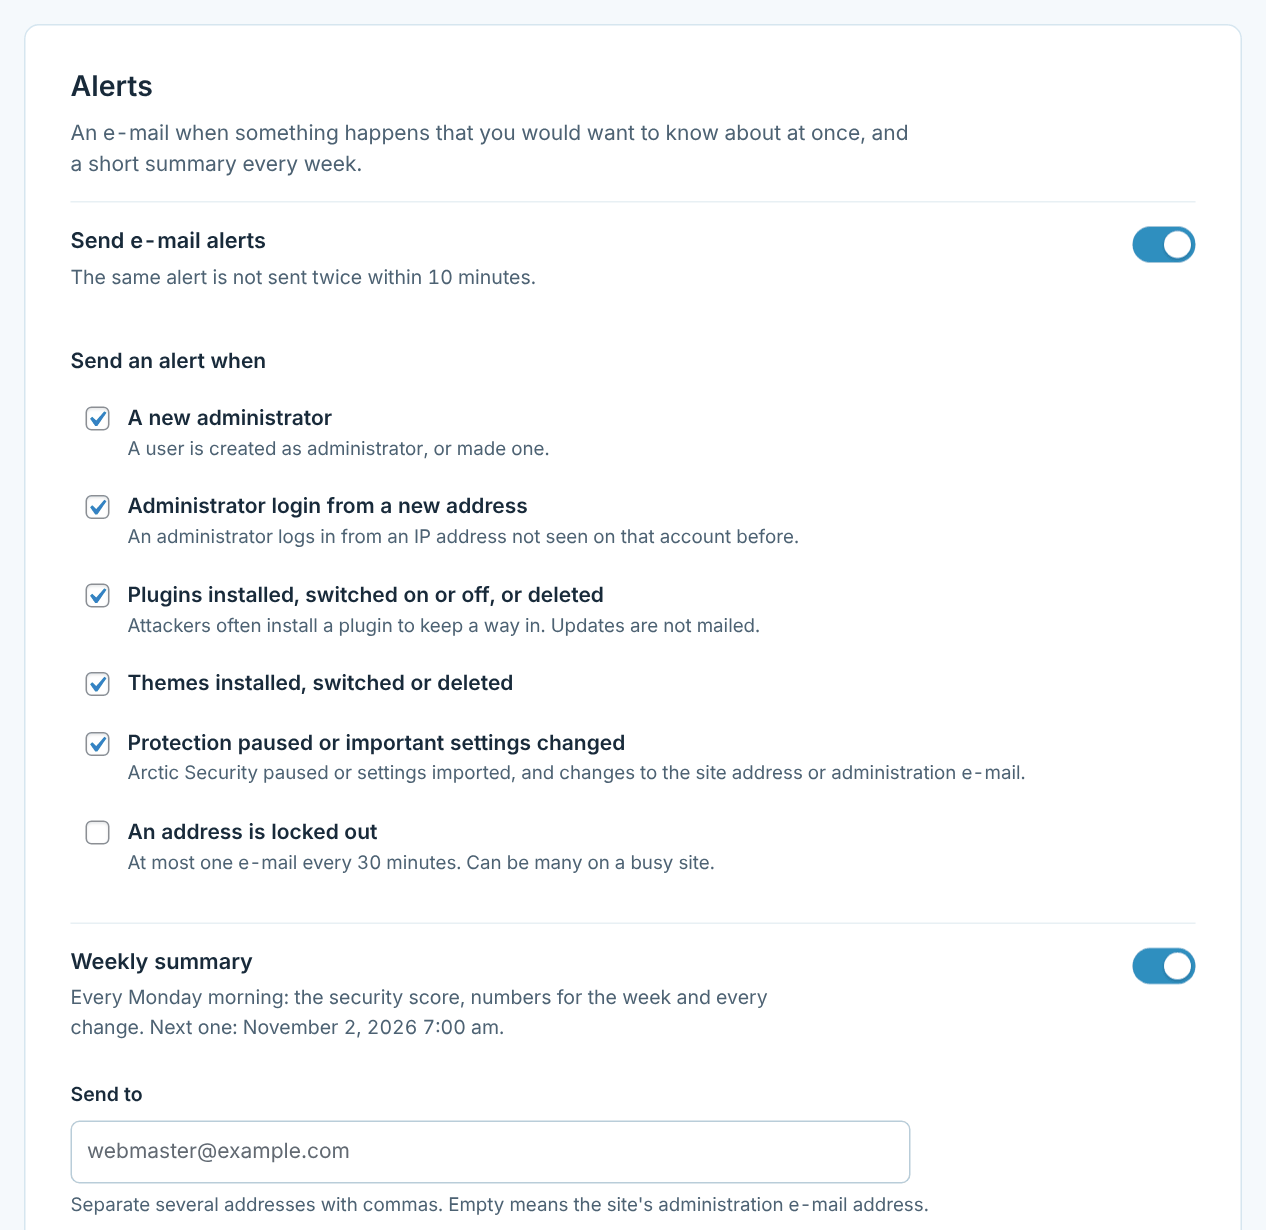
The same alert is never sent twice within 10 minutes. Leave “Send to” empty to use the site’s administration e-mail, or add several addresses separated by commas. Press Send a test alert to check that e-mail arrives.
The weekly summary comes every Monday morning with the score and how it changed, the numbers for the week, the busiest addresses and every change.
wp-cron.php.Monitor
File check
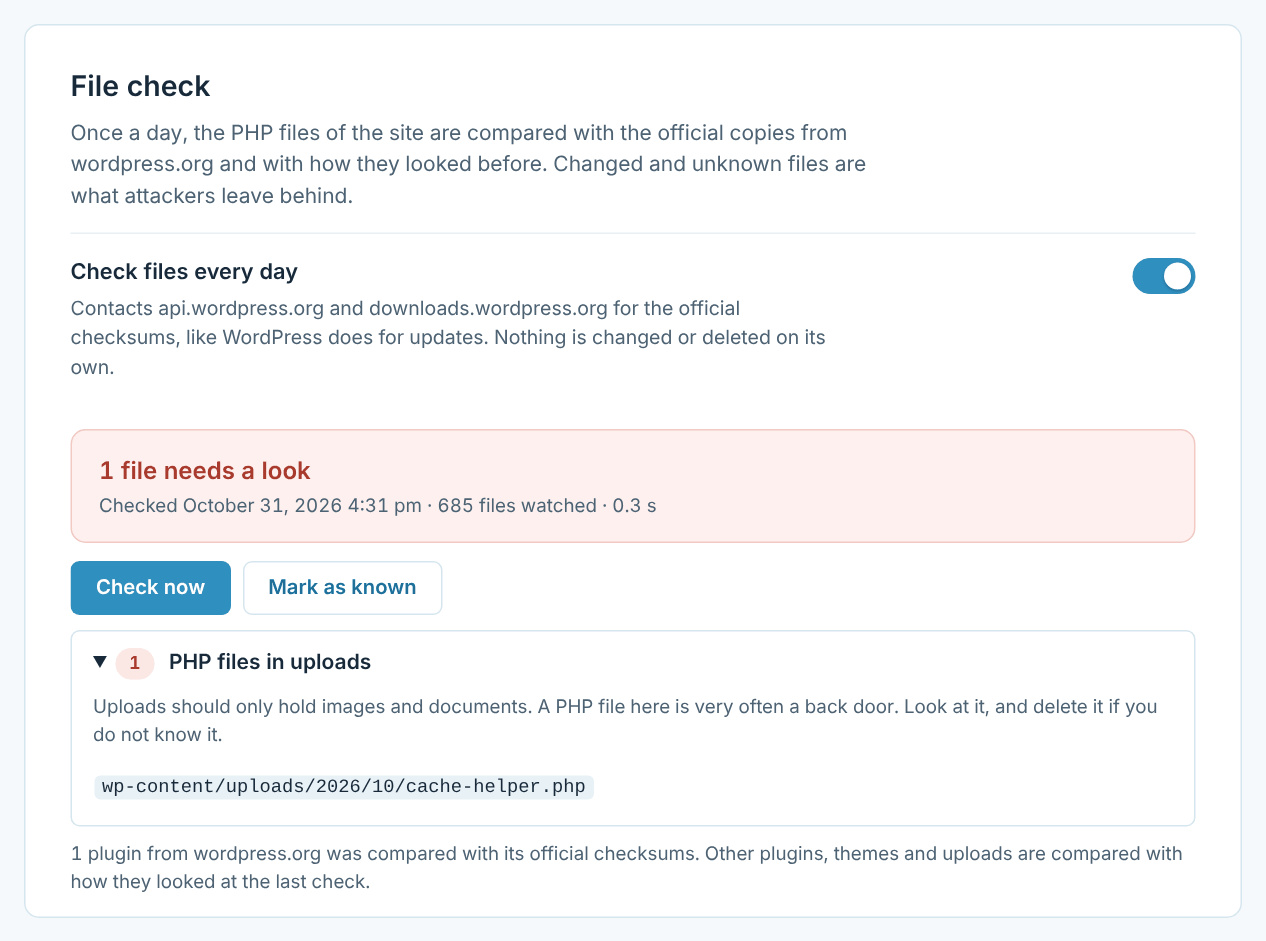
Once a day, Monitor → File check looks at every PHP file on the site. Changed WordPress files, unknown files and new PHP files are what attackers leave behind, so this is the best way to notice a break-in.
- WordPress itself is compared with the official checksums from wordpress.org. Changed files and PHP files that do not belong in wp-admin, wp-includes or the main folder are reported.
- Plugins from wordpress.org are compared with their official checksums.
- Everything else – other plugins, themes, must-use plugins and uploads – is compared with how it looked at the last check. Updates done through WordPress are trusted automatically.
| Finding | What to do |
|---|---|
| WordPress files changed | Reinstall WordPress under Dashboard → Updates (“Re-install version”). |
| PHP files in uploads | Look at the file and delete it if you do not know it. Uploads should only hold images and documents. |
| Unknown files | PHP files in WordPress’s own folders or in a wordpress.org plugin that are not part of the official copy. Very often a back door. |
| Plugin files changed | Reinstall the plugin from wordpress.org. |
| New or changed PHP files | Fine if you uploaded them yourself (by FTP, for example). Otherwise treat them as suspicious. |
When you know where every finding comes from, press Mark as known. You will be told again if one of the files changes later. Each new finding is logged once and sent as an alert.
Monitor
Copy settings to another site
Monitor → Import and export copies every setting to another site as a JSON file.
- On the first site, press Download settings. The recovery URL is never included. reCAPTCHA keys only come along if you tick the box – they belong to one domain.
- On the new site, choose the file and press Import settings. With “Keep this site’s login address…” ticked, the new site keeps its own login address, renamed paths, REST and author addresses and IP source.
- Check the result. If you change your mind, Undo the import puts the earlier settings back.
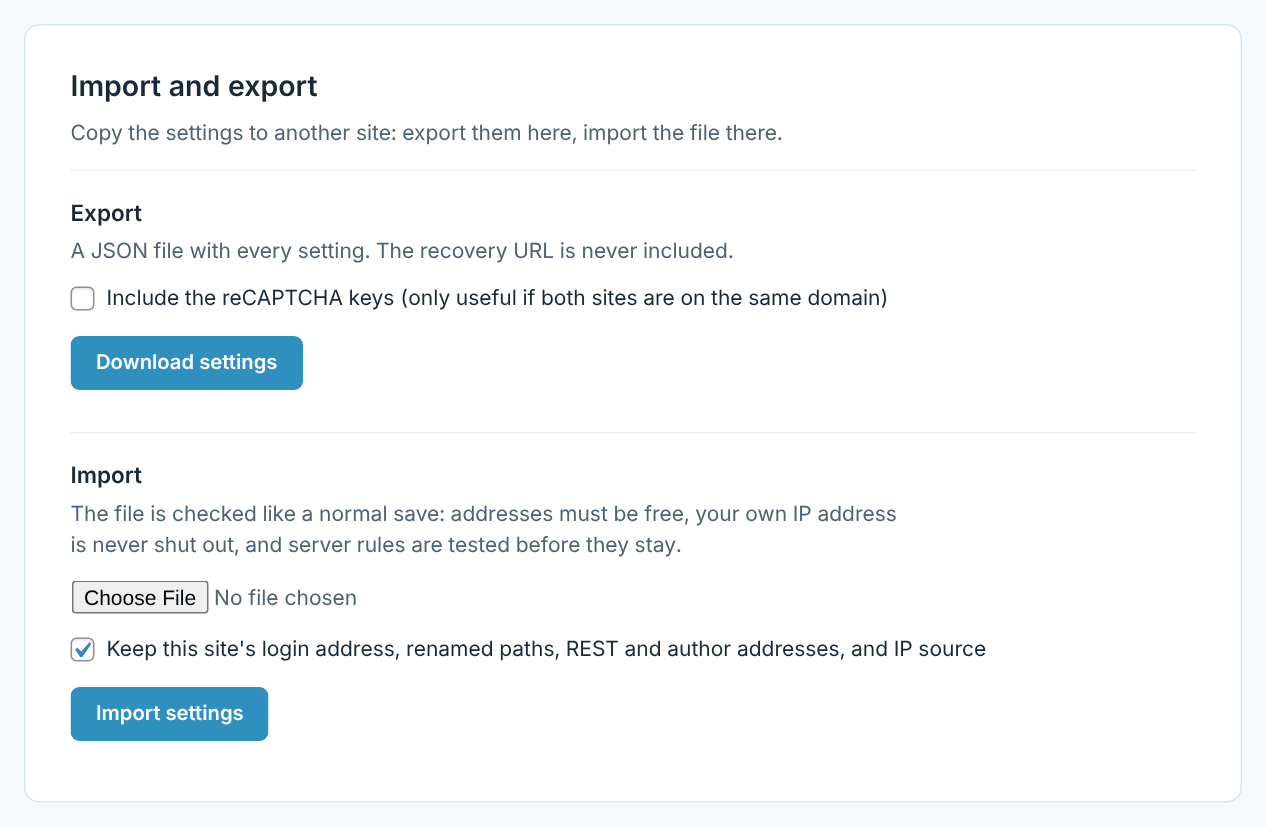
The file is checked like a normal save: addresses must be free, your own IP address is never shut out, and server rules are tested before they stay.
Protect
WooCommerce
Shops attract their own kind of bots: they test stolen cards at the checkout, guess coupon codes and create fake customer accounts. The Protect → WooCommerce tab is only shown when WooCommerce is active, and everything on it is off until you switch it on.
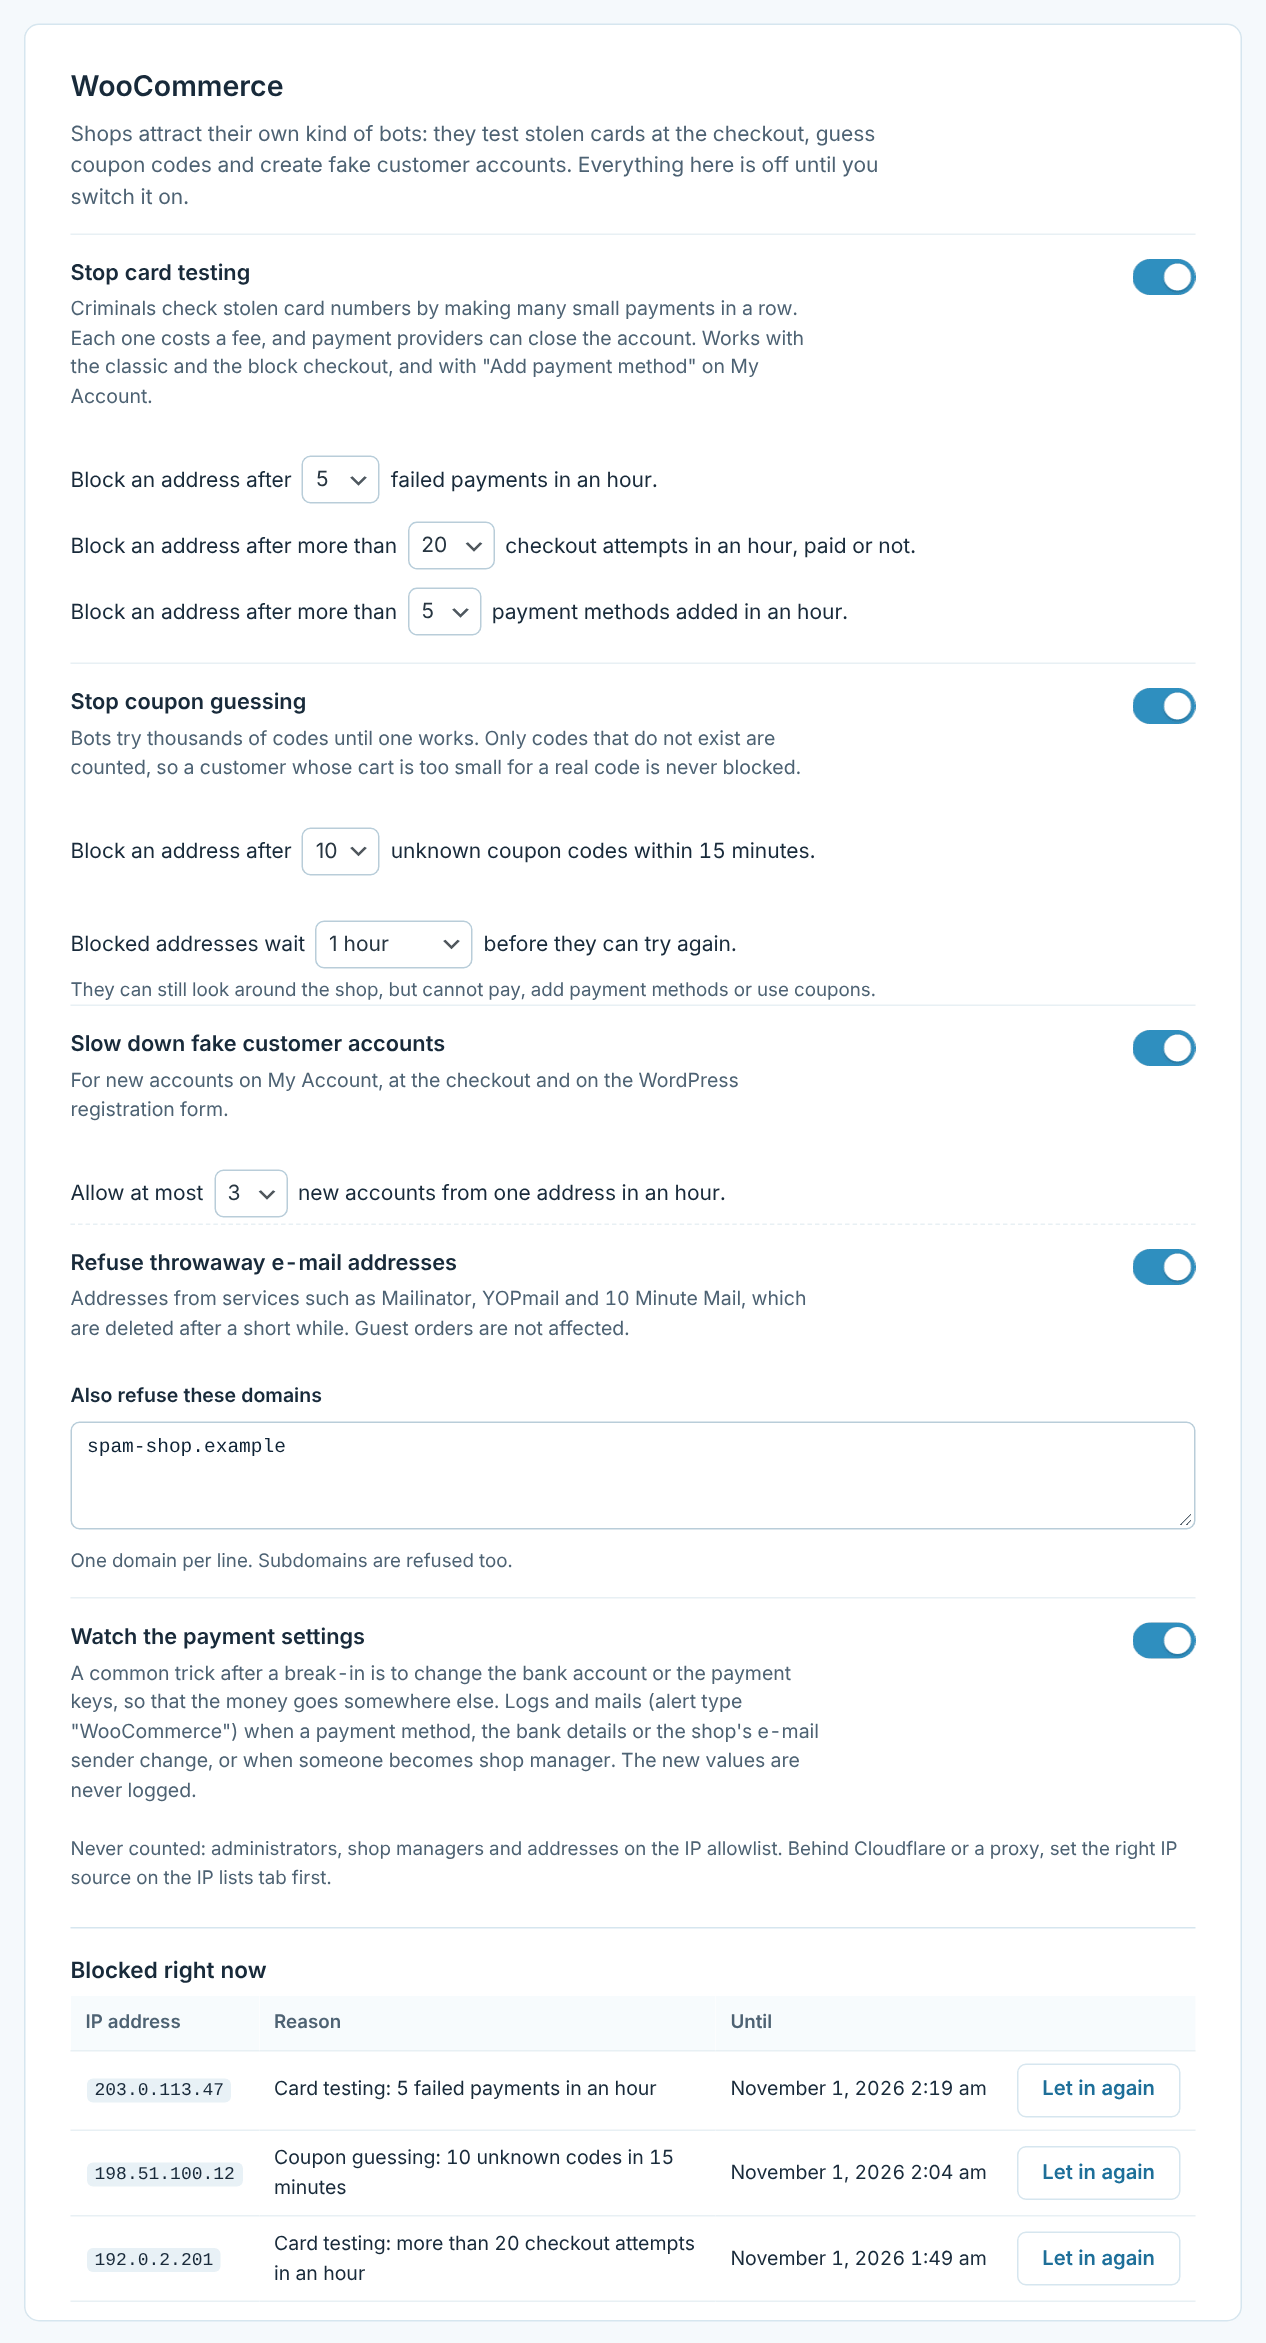
| Setting | Standard | Advice |
|---|---|---|
| Stop card testing | Block after 5 failed payments, more than 20 checkout attempts or more than 5 payment methods added in an hour | Switch it on for every shop that takes card payments. Card testing costs a fee per attempt and can get the payment account closed. |
| Stop coupon guessing | Block after 10 unknown codes within 15 minutes | Switch it on if you use coupons. Only codes that do not exist count, so a customer whose cart is too small for a real code is never blocked. |
| Blocked addresses wait | 1 hour | 4 or 24 hours if the same addresses keep coming back. |
| Slow down fake customer accounts | 3 new accounts per address per hour, throwaway addresses refused | Useful if spam accounts show up under Users. Add domains you see often to your own list. |
| Watch the payment settings | Off | Switch it on. A changed bank account or payment key after a break-in sends the money somewhere else. |
What a blocked customer sees
A blocked address can still browse the shop. Paying, adding payment methods and using coupons are refused with the message “Too many attempts from your address. Please wait a while and try again, or contact the shop.” No order is created. Blocked addresses are listed under Blocked right now with a Let in again button, and every block is in the activity log under WooCommerce.
Alerts
Tick WooCommerce under Monitor → Alerts to get an e-mail when a payment method, the bank details or the shop’s e-mail sender change, when someone becomes shop manager, or when an address is blocked. Values such as API keys and account numbers are never logged or mailed.
Help
Emergency
When you think someone has broken in, or a password has leaked: shut the doors first, then clean up. Emergency is next to Recovery in the menu.
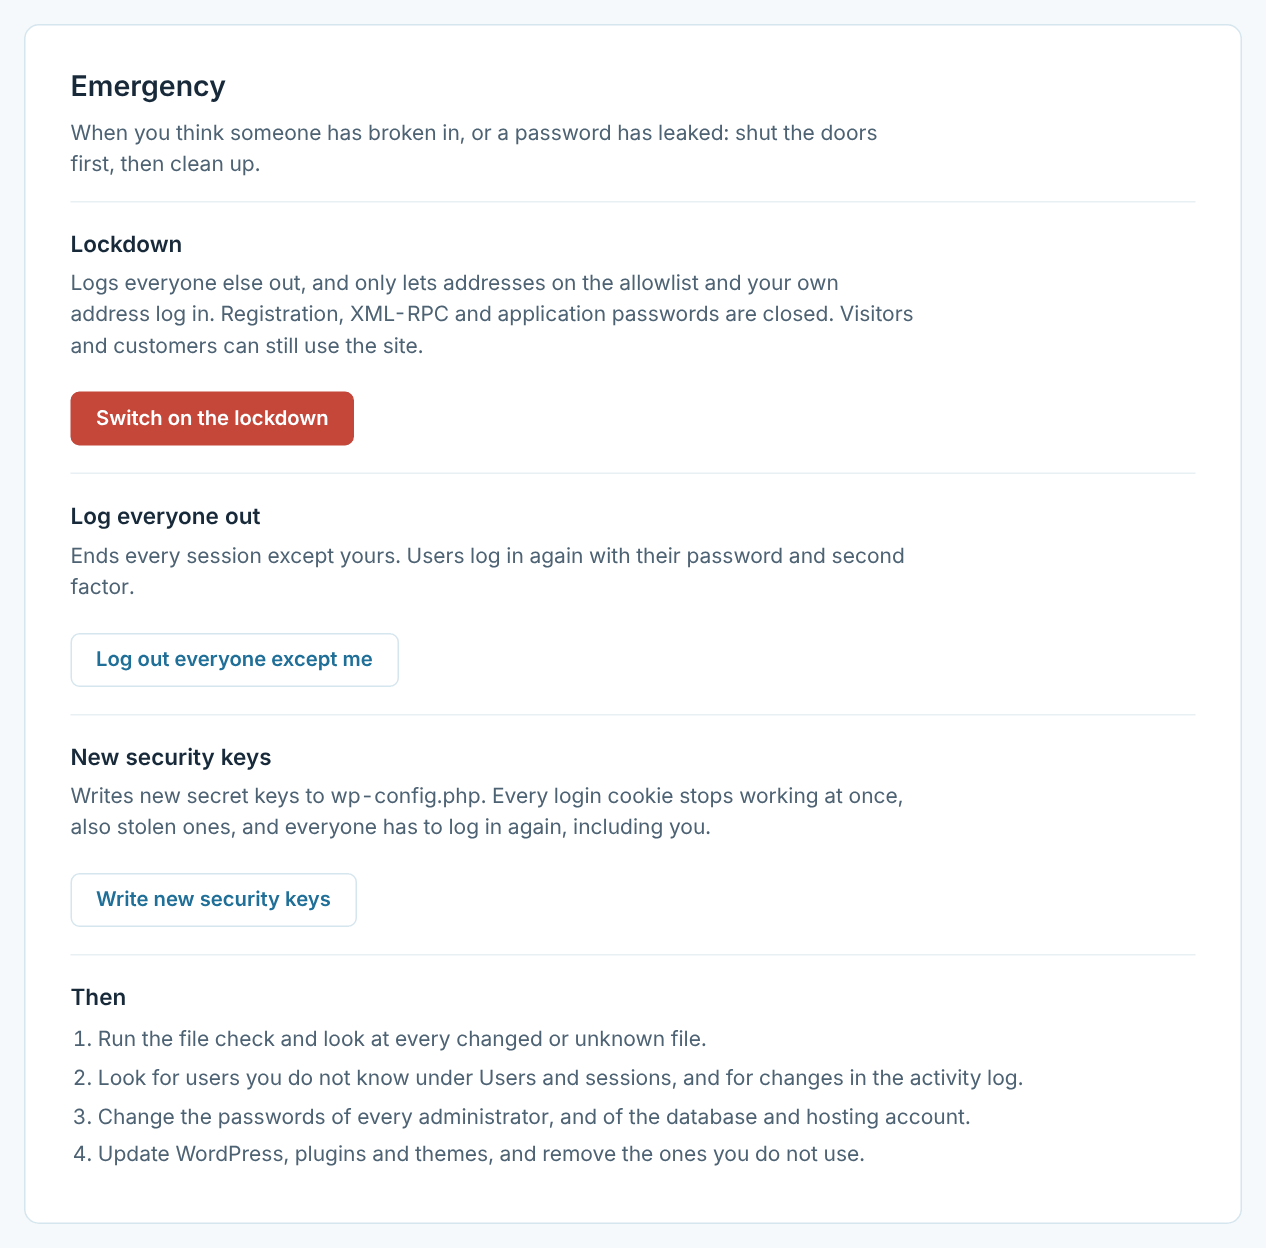
- Lockdown: logs everyone else out, and only lets addresses on the allowlist and your own address log in. Registration, XML-RPC and application passwords are closed. Visitors and customers can still use the site. A banner in the dashboard reminds you to end it.
- Log everyone out: ends every session except yours. Users log in again with their password and second factor.
- New security keys: writes new secret keys to
wp-config.php. Every login cookie stops working, also stolen ones, and everyone has to log in again – including you. The site is loaded afterwards, and the old file is put back if it fails. If WordPress cannot write to wp-config.php, the tab tells you how to do it by hand.
Then
- Run the file check and look at every changed or unknown file.
- Look for users you do not know under Users and sessions, and for changes in the activity log.
- Change the passwords of every administrator, and of the database and hosting account.
- Update WordPress, plugins and themes, and remove the ones you do not use.
Help
Troubleshooting
Open the recovery URL. Without it, add define( 'ARCTIC_SECURITY_DISABLE', true ); to wp-config.php, log in at /wp-login.php, fix the setting and remove the line. You can also rename the plugin folder over FTP.
The plugin tests every .htaccess change and takes it back at once if the site fails, so this is rare. If it happens anyway, delete the lines between # BEGIN Arctic Security and # END Arctic Security in .htaccess, and tell us which host you use.
The HTTPS redirect cannot see that visits come over HTTPS. Switch the redirect off on the Headers tab (or use the recovery URL), and ask your host to pass on X-Forwarded-Proto: https.
A cache is serving an old copy. Clear the caching plugin, the server cache and the CDN, test in a private window, and exclude the login address from page caching.
The server rule is not working. On Nginx, copy the rules from the Paths tab and press Test rules. Until the test passes, the real folder names are used, so switching paths off always brings everything back.
Switch back to “Report only”, open the page that broke in a private window, and look at “Reported in the last 30 days”. Allow the source that is missing, and try again.
A script without the nonce was refused. Switch the policy back to “Report only”, open the page in a private window and look under “Reported in the last 30 days”. “A script without the nonce” is a script printed into the content, and “unsafe-eval” means a script needs eval(): switch on Allow eval(). Until it is sorted, choose “As written in the policy” under Scripts.
The firewall caught it. Find the request in the activity log under Firewall, and switch that group off.
The IP source is wrong, so all visitors seem to have the same address. Choose the right source on the IP lists tab, and let the address in again under Login attempts.
The scan guard or the blocklist has shut out their address. Look under Scan guard → Blocked right now and press Let in again. If it happens to real visitors, raise the number of missing pages, and check the IP source.
Look at “Log out when idle” under Users and sessions. Also check that nobody pressed “Log out everyone” or wrote new security keys on the Emergency tab; both are in the activity log.
Their address may be blocked by the WooCommerce protection. Look under WooCommerce → Blocked right now and press Let in again. If it happens to real customers, check the IP source on the IP lists tab, and raise the limits.
Press Send a test alert. If it does not arrive, install an SMTP plugin. If the test arrives but the summary does not, the site’s scheduler may not run often enough: set up a real cron job.
Still stuck? Get in touch and tell us your WordPress version, your host and what you see.